Showing posts with label diseases. Show all posts

Monday, 17 August 2015

Tomato Update

As usual, I've grown a range of tomato varieties this year, all lined up across my patio. They're barely ripe yet - I'm still waiting on four out of the five varieties to redden - but it's looking like a pretty good crop on the way!


The first variety, nearest my door, is Skykomish, an open-pollinated variety from Real Seeds that is supposed to be blight resistant. Unfortunately it's the least vigorous of the lot, hasn't grown very tall, and has the least fruit on it (fruit set seems poor) - and it's always had a few sickly-looking yellowy leaves! The fruits are a real mix of sizes, but there are a few nice big ones so hopefully it will be worthwhile in the end...


The next is Indigo Rose, the black tomato bred to be very high in antioxidants (anthocyanins, like in blueberries). The dark leaves and black fruits look rather dramatic and prompted lots of questions when I had friends round for a barbecue, but the plants have always looked rather stressed, with curled leaves, no matter how I've cared for them!


Whatever the problem is, it hasn't stopped the plant producing an abundance of fruit on looong trusses. They look black from any distance, but if you peek underneath, where the sun don't shine, they have green patches, and it's these I'm watching to check for ripeness - they should turn red eventually...


In the middle is Angelle, my trusty favourite from seeds saved from hybrid supermarket toms. I used to save the seed from year to year but they got more and more susceptible to blight with each generation, so I've started again from the hybrid this year. They're performing as well as before and are the most vigorous (and tallest) of the bunch, with huge trusses of small plum-shaped toms - and they've been the first to ripen!


We have a few Angelle plants in a plastic greenhouse on the allotment too, and under cover they ripened even quicker - we've had a few harvests from them now while we're only just about to start picking the ones at home.

Next in line is heirloom Amish Paste, a great tom for cooking (though I like it sliced as well), with vigorous plants and huuuge fruits!


I've had my first-ever experience of blossom-end rot this year with these - my watering habit must have slipped! - but thankfully only lost one truss of fruits, and I've been extra careful to water well since to prevent it from happening again. Blossom-end rot is caused by a lack of calcium, but it's rarely actually a shortage of calcium in the soil; more often lack of good transport through the plant's system, due to a shortage of water.


Finally, Dr Carolyn, another Real Seeds heirloom which I love, and they're doing really well. They're not as productive as some other varieties, but they're delicious!


I had the dreaded notification from Blightwatch at the weekend that my area was experiencing a 'Smith period' - perfect conditions for blight to develop - so I'm watching them carefully now for any signs. I'm disappointed that we've reached this stage already and I've harvested so few ripe toms so far - I think I need to choose an early variety or two next year so I can start picking sooner. In the meantime, I've cut a lot of the leaves off these plants to try to speed ripening - really I should have started this sooner so that air circulation around the plants was better when the conditions for blight struck. I've taken off everything below the first truss and leaves which crossed over and touched each other a lot, and I've taken off leaves which shaded the fruits a lot.


It's only been a day since I did it and I'm sure I can see new tinges of colour appearing already, so hopefully it's working! But when blight does strike, I'll be ready to pick lots of the toms green and use them in chutney, green chilli and whatever other green tomato recipes I can drag up!

Saturday, 21 March 2015

More Geeky Soil Stuff: My Soil Analysis Results!

As I've mentioned before, I resolved to get a proper lab analysis done of my soil this year, to identify any deficiencies and attempt to bring it to - or close to - the ideal mineral balance described in Steve Solomon's book The Intelligent Gardener: Growing Nutrient-Dense Food.

I took not just one but four soil samples. The allotment is perhaps the most important, but I also wanted to test the raised bed soil which gave poor growth last year and the soil of my garden veg bed, which did very well last year but which I suspected of a boron deficiency due to some hollow courgettes. Finally, I thought I might as well send off a sample of FoodSmiles soil as well, mostly out of curiosity.


To take a sample, you're supposed to cut regular-sized-and-shaped slices of soil, six inches deep and an inch or so across each way, from several points on the plot, to get a mix representative of the whole area. Professional soil-testers have a tube-shaped device they use to get a perfect even core of soil each time. I was just working with a spade and trowel... but I think I did good enough for a first-timer! For each sample, I put all the soil 'slices' in a bucket or bowl and let them air-dry near a radiator for a few days, then broke up any big lumps, picked out stones and twigs, mixed it all up really well and bagged up two cups of the soil for sending off.

Sending it off was a faff as well! I could only find one lab in the UK that would do the soil test described in Solomon's book - what's called a Mehlich 3 extraction along with pH, organic matter, total cation exchange capacity and base saturation - and it cost three times more than what it costs in Solomon's recommended lab in the US... So I sent my samples off to the US! I felt a bit guilty about the air miles, but I couldn't have afforded to do it any other way. Samples had to be labelled and double bagged, sealed very securely in a strong envelope with all the seams taped up, and an import permit and special label attached to the outside of the package to declare what was inside and show that I was allowed to send foreign soil to this address!


It must have made it through, because two weeks later, my results came by email, and you can see the full report here if you like. But most of the numbers are fairly meaningless until you take a deeper look; everything swings on the TCEC, which indicates the amount of nutrition a soil can hold, so XX lbs per acre of a nutrient might be way too much for a soil with a low TCEC, but not nearly enough for a soil with a high TCEC. Solomon provides worksheets to help crunch the numbers and figure out exactly what your soil has and what it needs.

A Note on Organics...

The soil amendment 'prescriptions' mentioned here, involving measured amounts of all sorts of mineral compounds, might seem to go against the grain for someone who is concerned with gardening organically and sustainably, and have certainly given me cause to think a bit about 'organic' versus 'chemical' fertilisers. But there are plenty of mineral soil amendments approved for organic use where a need is identified, and just because it's not organic compost or manure, doesn't mean a substance is necessarily harmful in any way. Adding pure mineral supplements carefully chosen according to measured needs is a very far cry from routinely applying synthetic, high-nitrate, petroleum-based mixes (many of which contain heavy metals) at maximum application rates, as is much too often done in modern agriculture; these kinds of chemical fertilisers feed the plants but diminish soil fertility. In his book Solomon spends quite a lot of time discussing the sustainability and impacts of different amendments, and before buying I will check out each one and decide individually whether I want to use it - but even though Solomon's method isn't 100% 'organic' all the time, these amendments are all designed to help the soil and its microlife, which is of key importance in this soil health business!

Allotment

The allotment soil has a pH of 7.1 - just above neutral which is what most veg-growers will aim for, with a range of 6.0-7.5 commonly recommended. 6.5 might be nearer to ideal, but since different veggies like slightly different conditions it's certainly good enough.

It contains 7.6% organic matter, which will supply more than enough of nitrogen through the growing season as it is digested by soil organisms. 7% is plenty - 4% is about the minimum it needs and 10% is more than a soil can efficiently use. More good news! I'm actually surprised it's this high, since I've never been good at adding organic stuff to the soil. I compost allotment waste and return it to the soil as and when it's ready, but only once in eight years have I bought in manure and compost to spread, and I know some gardeners do it religiously every year.

The TCEC is 13.1, which indicates a good level of nutrient-holding clay and humus in our soil. TCECs in very rich clay soils might be as high as 40 or more, but for the purposes of the analysis it only matters whether our TCEC is below or above 10, and above is a good result.

The main purpose of this exercise is to make sure the major cations - calcium, magnesium, potassium and sodium - are in balance, and a good supply of sulphur, phosphorus and trace nutrients are available. 68% of the TCEC should be calcium, 12% should be magnesium, 3 or 4% percent potassium and 1 or 2% sodium. The allotment soil has an excess of calcium and potassium and a deficiency of magnesium and sodium - a balance of 81%, 10%, 4.5% and 0.3%, so I'll take some action to adjust this balance. It also has very significant sulphur deficiency. Phosphorus is very slightly low but not enough to worry about.

Trace minerals measured are boron, iron, manganese, copper and zinc. In the allotment soil, iron, copper and zinc are plentiful (with more than twice the iron needed and more than four times the zinc!) but boron and manganese are very low, so I'll aim to add more of these.

The prescription to amend this soil is to add, per 100 square feet, 225g manganese sulphate, 120g sea salt, 110g agricultural sulphur, 60g magnesium oxide and 20g borax.

Garden soil

It was extremely difficult to get an accurately representative sample of the garden veg bed as it comprises two very different layers: a few inches of old bagged compost and used growbags on top, and a hard clay just underneath at a depth that varies across the bed... So my confidence in the accuracy of these results is lacking slightly, but I was interested to see them anyway.

The pH is 6.8 - very slightly acid and pretty perfect for growing vegetables. The organic matter was very high - 38% - but perhaps not surprising given the thick layer of old compost. The TCEC is high too at 17.9, probably thanks to the heavy clay.

The cation balance is heavily weighted to calcium and magnesium, with potassium slightly low and sodium very low. Funny how we're told salt is terrible for soil - actually a small amount is very important, but it looks like most of our soils don't even have that much. Sulphur and phosphorus are both significantly low, as are boron, manganese, copper and zinc. The boron deficiency I suspected is shown, but actually it's only very slightly lower than any of the other soils I had tested.

The prescription for this soil is 760g monoammonium phosphate, 414g sea salt, 212g manganese sulphate, 110g sulphur, 40g zinc sulphate, 28g copper sulphate and 20g borax per 100 square feet. I think I might take a cautious approach to making the amendments, considering I'm not confident in the consistency of my soil sample, and just aim to fix the worst of it this time round.

Raised Beds

Now this one was interesting. As I described at length a few posts ago, this soil, bought in to fill my new raised beds about this time last year, gave extremely poor growth last season. I suspected an overabundance of potassium and perhaps a low pH, and added calcium and nitrogen to try to counter those things and help plant growth but it didn't really help.

In fact, this is a calcareous soil with an overabundance of free lime and a high pH which makes trace nutrients unavailable to plants. If I pour vinegar onto the soil, it actually fizzes! This means the test I ordered isn't accurate, as a Mehlich 3 extraction can't test accurately where high lime is present - I should have done the vinegar test first and ordered a different soil test... Doh!

The soil shows a pH of 7.7 but this is likely to be artificially low. There does indeed appear to be a high level of potassium, but the level of lime and high pH is clearly the bigger problem and, save ordering a new soil test and a whole load more mucking about, I think the easiest way forward is to address that first by applying sulphur, which is turned into sulphuric acid by soil bacteria and neutralises the surplus calcium carbonate, turning it into highly soluble gypsum which will then easily leach from the soil. This takes time; a year or more. So in the meantime it will be important to only grow what is happy in these beds; so far garlic, brassicas, lettuces, carrots and beets; and to feed plants with a foliar spray to ensure they get the trace elements they need.

I have real trouble understanding how a soil mix that was obviously so high in manure and woody waste can be so very high in lime, but I guess it looks like my lime application last year may have only made things worse - doh again!

FoodSmiles

The FoodSmiles soil has a pH of 7.3 - right at the high end of a good range - a TCEC of 15.2, and 7.6% organic matter. Its cation balance is not too far from the target, with small excesses of calcium, magnesium and potassium but a deficiency of sodium. Phosphorus and sulphur are both very low. Like the allotment, it has very high levels of iron and zinc, but it is low in boron, copper and manganese.

Amending this soil with mineral applications would be a whole different ball game, since it is Soil Association certified land and we'd have to show a clear need for every amendment and have it approved in advance - and we've got more than enough to do at the moment anyway! But it hasn't had a lot of organic matter added in recent years and I expect applying manure would bring a beneficial pH change. IF I was going to tackle anything else, the priority would be to amend the sulphur and phosphorus levels, but at the moment the soil is growing crops very well indeed.

Some Thoughts

As I write this, I'm wondering about those high levels of iron and zinc... Solomon warns that tiny flakes of rust or galvanizing from the tool used to take the samples can inflate these levels. I didn't have a steel tool I could do it with but I did clean my trowel thoroughly and make sure nothing looked like it was going to come off it... If I do this again in future I'll be sure to be prepared and use stainless steel instead just in case!

All the soils tested require, according to this method, a significant application of sea salt, which feels a bit wrong but I'm doing my best to trust the method and go with it!

I have high hopes that if I correct the sulphur level on the allotment, I might be able to grow onions and garlic there again; sulphur protects against fungus so perhaps the lack of it allows the white rot to thrive.

My next task, then, is to read up on and source the various minerals needed to amend the allotment soil and garden bed, and sulphur for the raised beds. It's quite a bit of work, all in all, but it's absolutely fascinating and I'm really looking forward to seeing the results!

Tuesday, 23 September 2014

Crop Rotation Confessions...

I have a confession to make. Crop rotation on a small plot has always rather baffled me. On a big plot it makes sense - on a big plot you can afford to leave a patch of ground empty in preparation for a later crop, or to sow a green manure in the middle of summer just for the heck of it - but on a small allotment where you want to make the most of every space all year round, it can be a real juggling act trying to get your potatoes out early enough for your purple-sprouting broccoli to go in, or clearing your onion patch in time to sow beans and corn, or figuring out what on earth to grow after you've harvested your squashes as late as October - and who uses exactly the same amount of space for every crop group anyway??

Traditionally, the main groups in a crop rotation are potatoes and roots, brassicas, beans, and 'other veg'. The potatoes are manured to enrich and slightly acidify the soil (preventing scab), heavy-feeding beans follow in the nicely broken-up ground after the potatoes are dug, then (often after an application of lime,) leafy brassicas to make good use of the nitrogen the bean roots accumulate. Then, presumably, you throw sweetcorn, cucurbits, tomatoes, leafy greens and everything else in together after that. Sounds simple enough, but questions abound. Do you grow swedes with the root crops or the brassicas? Aren't tomatoes in the same family as potatoes? Cucurbits take up way more space than anything else! And aren't you supposed to avoid manuring carrots?

I don't know, maybe I overthink these things - maybe I'm just too keen to abide by all the rules and to do it "right". But I think, after eight years on our allotment, I've finally cracked it!

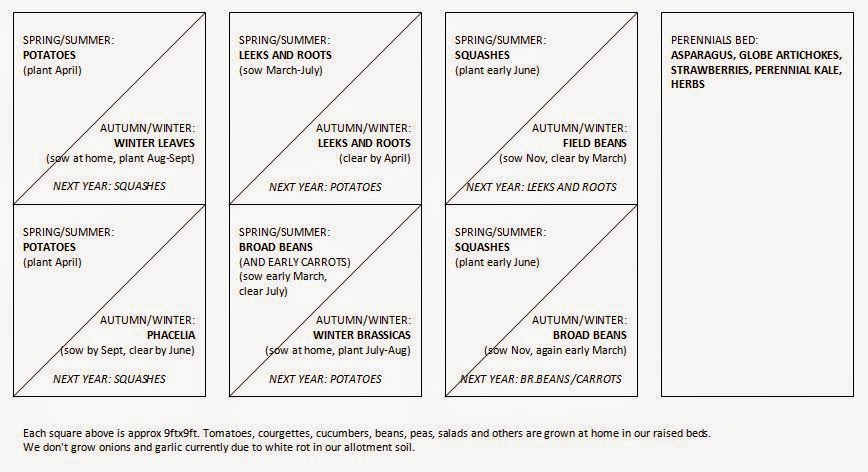
This is partly thanks to slimming down the number of crops we grow on the allotment anyway - we don't grow onions and garlic due to white rot spores in our soil, and we prefer to keep salad leaves and quick-ripening summer crops like French beans, courgettes and tomatoes at home so we can pick them more regularly. On the allotment we grow the lower-maintenance stuff: potatoes, squashes, root veg, broad beans, leeks, and a limited amount of winter brassicas and spinach-type leaves (plus some perennials in a permanent area). We've grouped broad beans, leeks and root veg roughly together: together they take up about the same amount of space we use for more space-hungry crops (potatoes and squashes), and it means we can follow our broad beans (which finish around midsummer) with winter brassicas, thus keeping our earlier-sown swedes in the same area as our other brassicas.

Ladies and gents, I give you our brand new crop rotation plan! (Click pic to enlarge.)


This rotation also allows for two squares to be sown with green manures over winter to add high-nitrogen organic matter to the compost heap, shelter wildlife and protect the soil. Phacelia and field beans are my two favoured green manures since field beans add vital nitrogen to the soil and can be sown as late as November, and phacelia attracts lots of insects and can be sown as late as September. Following squashes with winter-hardy beans means the timing for sowing is perfect; likewise with the winter leaves following the potatoes, and the winter brassicas following the broad beans. And even though we grow most of our beans at home, our allotment soil still gets a nitrogen injection thanks to the broad and field beans. Of course, this rotation doesn't include everything and I should do my best to efficiently rotate our crops at home too, but those on the allotment are the most important ones to rotate: beans for nitrogen, potatoes which are prone to damage from buildups of slugs and eelworms, and brassicas which are susceptible to clubroot, a very nasty fungal disease.

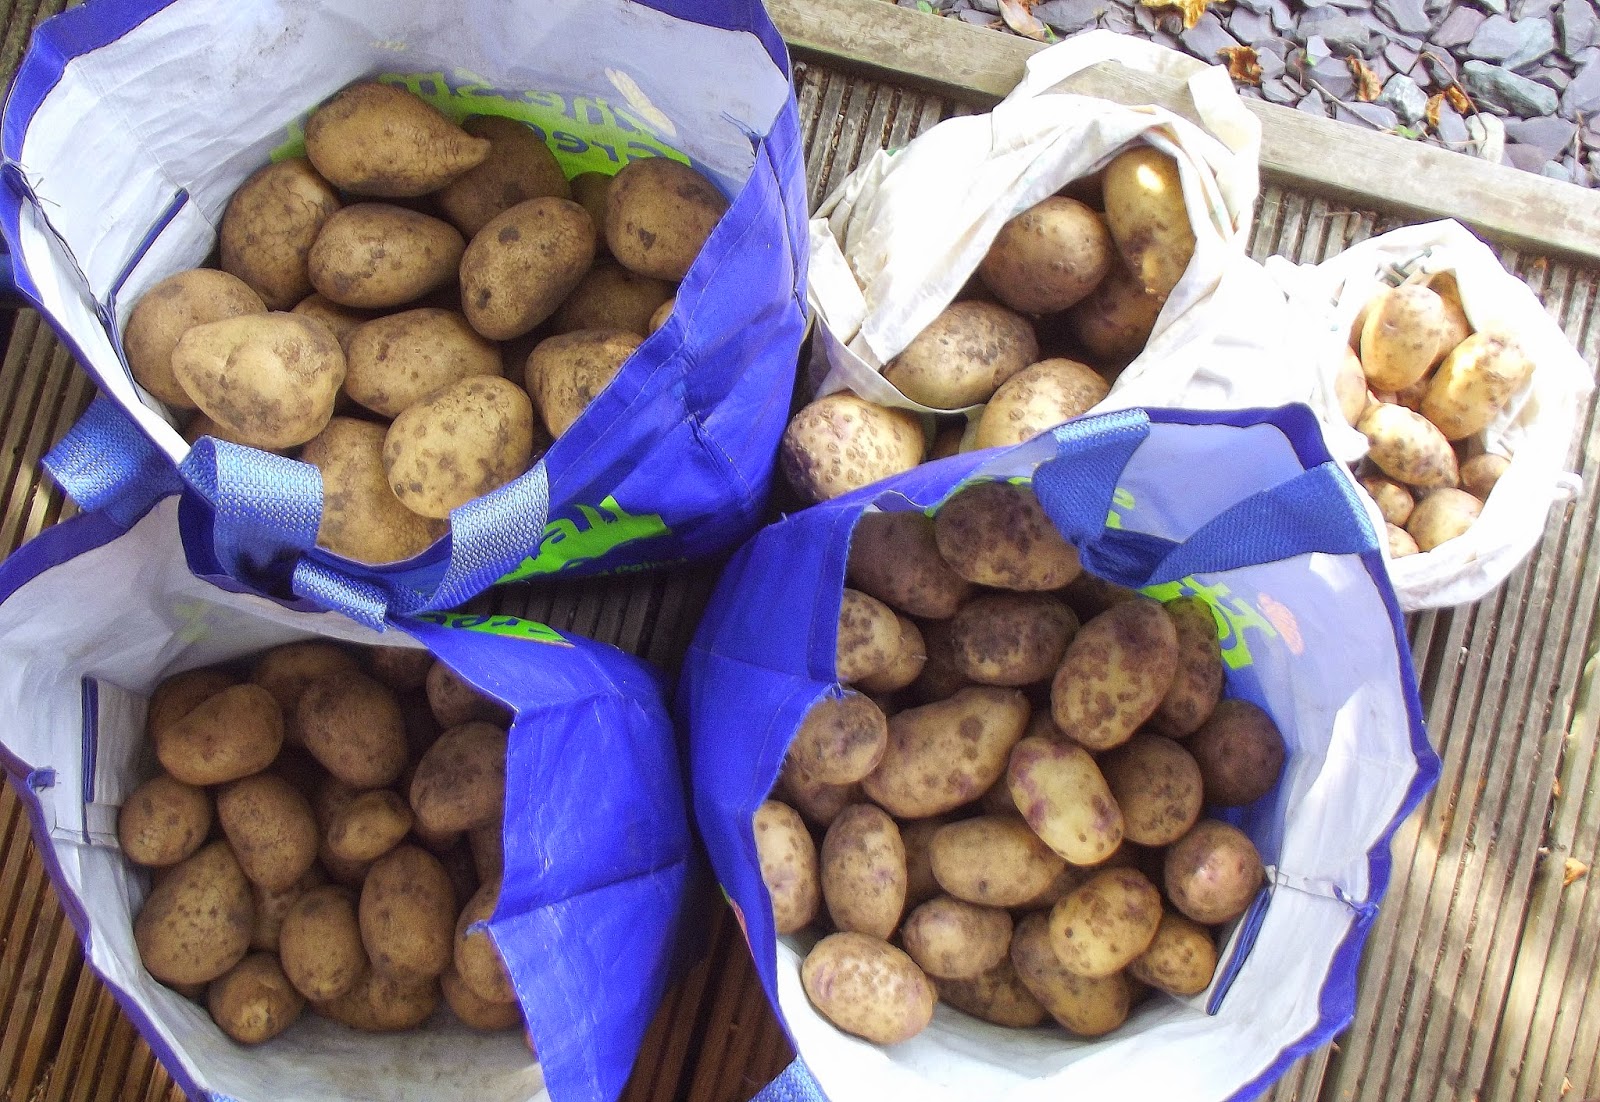
So far it's all going swimmingly. The potatoes are out (an awesome 28kg of Kestrel and 19kg Pentland Crown!) and the winter leaves are in; two rows of chard, two rows of winter spinach and a row of fennel (there's room for more, actually - I must do that). The squashes have finished a little earlier than usual, which means we have plenty of time to clear the soil for winter beans. The leeks, root veg, celery, spring cabbages, kohlrabi and pak choi are coming along nicely and we will slowly harvest them all winter long, making the most of all our space. Brilliant!


There is one complicating factor looming, in that we are planning to clear our old strawberry and asparagus beds (not shown in the plan above) over winter and put them to new use next spring. These two areas don't really fit into the plan so I'm a bit puzzled about what to do with them (and I rather wish we could move our pond and our apple tree into one, which would help us make better use of the other!). Should we grow runner beans or courgettes on the plot again after all? Shall I expand my collection of perennials? Is it time to give in and plant some fruit bushes? Good job I've got all winter to think about it...

Monday, 20 August 2012

Amazing Green Tomato Chilli!

*Sigh* My blog has been neglected for nearly a month now! Well who wants to read about this growing season? I certainly have little motivation to write about it. And after a summer-so-far of rotting roots, weather damage, poor growth and slug wars, I've now fought and lost the blight battle too.


Since I started growing tomatoes in my home garden instead of the allotment I've had much better results and much less blight - being able to keep a closer eye on them means catching it earlier, and they're less exposed to the elements. Last year, I was fairly convinced blight didn't even matter to my favourite Angelle tomatoes, which suffered lightly all summer - a few brown leaves here and there, and just one or two small patches on the stems which didn't spread - but didn't start losing fruit until right at the end of the season. This year, after holding off through the whole rainy period, as soon as the sun came out three or four weeks ago it struck hard. Is it all down to the endless rain and high humidity, I wonder, or has the fact I've ditched Levington's seaweed-enriched-but-not-peat-free growbags in favour of homemade compost made a difference too? Seaweed is supposed to provide a measure of disease protection after all. I can only speculate. I managed to pick about three handfuls of good tomatoes, but the rest have been blackening before they ripened, and this weekend I gave in and pulled the lot up. A heartbreaking waste.


I saved some of the best-looking green tomatoes and put them on a sunny windowsill to ripen, but my faith in them turning red rather than black was low so I started to look at other options. Last year I made green tomato chutney, which was very tasty, but I don't eat all that much chutney... Then I received a tip via Twitter from Nate at AFK (thanks Nate!) - green tomatoes can be used in place of tomatillos in dishes such as green chilli. (Tomatillos resemble green tomatoes, but are actually more closely related to cape gooseberries, and have a similar papery husk and a slightly citrussy flavour.) It sounded better than chutney to me, so off to Google I went to investigate.


Green chilli, or Chili Verde, is a Mexican/American dish of pork stewed with chillies, peppers and tomatillos. Having never, to my knowledge, had either tomatillos or green chilli before, I didn't really have a clue what the difference would be or what I was in for, but in light of my love for slow-cooked melt-in-your-mouth pork and the enthusiastic reviews of this highly-rated recipe on food.com, I could hardly wait to give it a go. I made quite a few changes to the recipe to suit our tastes and the ingredients I had available, and it seemed right to add beans as well, like in other types of chilli, so here's my version:


Chili Verde
(serves 4)
  • Roughly dice 600g-700g pork shoulder (or four pork shoulder steaks) and sear in a little oil, in a large saucepan or stockpot. Remove from the pan and drain all but a tablespoon of the fat.
  • Saute one diced onion and gently in the pork fat until soft.
  • Add 3 cloves garlic, crushed, to the pan and soften for a few moments, then return the pork to the pan, add 1 tsp cumin and 500ml chicken stock, bring to the boil and simmer for 30 minutes.
  • Add a green pepper, yellow pepper, one jalapeno (or more to taste), all finely chopped, and saute a few minutes until starting to soften.
  • Add 500g-600g finely chopped green tomatoes (or tomatillos!) and a tablespoon dried coriander leaf (or 3-4 tablespoons chopped fresh coriander - I'm just not keen on the flavour of fresh).
  • Bring to the boil, then simmer for two hours, uncovered, over the lowest heat possible. By this time the veggies should be mushy, the pork should fall apart on contact with a fork, and the stew should be reduced and thick.
  • Check seasoning. Don't be shy - I think the slight sourness and acid of the green tomatoes absorbs a little more salt than expected.
  • Drain, rinse, and add one can of white beans (pinto, cannellini, etc.).
  • Serve in burritos/tacos, over rice, or with tortilla chips. Add other tasty Mexican-style trimmings as you feel led!


It was really, really good - the flavours were lovely, the pork was beautifully fall-apart tender, and the beans went perfectly. It could easily be adapted for vegetarians too, with or without adding extra veggies. I'm very happy to have, at last, a really good use for those green tomatoes that would otherwise go to waste, and I expect salsa verde, with its many uses, could probably be made with green tomatoes too, as well as numerous stews and soups. In fact, I'm a bit gutted I don't have any more green tomatoes until probably this time next year - I wish I'd saved them all, not just the biggest loveliest ones! I might just have to go in search of some tomatillos instead...

Thursday, 12 July 2012

Six Strategies to Cope With Persistent Rainfall

At the beginning of the season I wrote about strategies for coping with drought and hosepipe bans. Hmm. Now, after two record-breakingly wet months, and amidst what is likely to become a third, I think it's time to start calling summer in Britain 'the wet season' and adjusting our practices to match, don't you? I've already talked about flooding, here, but what else can we do in future to improve the health of our plants when the sun don't shine?


1 - Look after your soil
Organic matter is a must for healthy soil; not only does it retain moisture to protect plants from drought, but it improves drainage too, by providing a more open soil structure. Dig it in early in the season, or spread it on top and let the worms do the work. Organic matter is even more important in heavy clay soils, which waterlog easily. To improve drainage even more, create a lighter soil by adding sand.

2 - Plan for good drainage
Raised beds are the ultimate in improved drainage for veg crops - assuming of course they are filled with good, well-draining soil. It can also be useful to plant on mounds or ridges. Aerate soil by spiking it to help drainage and drying. There is debate about whether crocks or stones in the bottoms of pots actually help or hinder drainage - scientists say they hinder it - but one thing we must certainly do is make sure there are enough drainage holes in our pots and make sure they stay clear. Raising containers off the ground on bricks or stones will also help. If you have a serious problem, consider a drainage trench or soakaway, filled with rubble or gravel, to carry water away. You can leave it open or top it with plastic sheeting and cover with soil.

3 - Restore nutrients
Excessive watering can leach nutrients out of the soil and leave plants hungry, so be sure to feed them regularly. Liquid feed, though, may do more harm than good in a very wet container! Blood, fish and bone is a great all-round dry feed which you can just sprinkle on the soil and allow the rain to water in gently, or work into the top few inches of damp soil. Rock dust is a highly recommended soil 'remineraliser', which I've just begun experimenting with this year - they say it improves plant health and yields dramatically... Seaweed is another good all-round plant-booster, that stimulates and strengthens plants against all problems. It can be watered in or used as a foliar feed on dry days.

4 - Protect your plants
I know I'm always whinging about not having a greenhouse, but this year it would have been more useful than ever. Cucumbers and gherkins dropped dead in the gloom and even cool-weather peas and asparagus grew painfully slowly. A little cover to intensify what few UV rays we've had would probably have been a great benefit. If this wet-summer trend continues, I think growing under glass or plastic will become more and more important, and I will certainly try to grow my cucumbers under cover after this year. Others that would benefit from it are tomatoes of course, French beans, peppers and chillies, strawberries and asparagus. Rosemary hates being wet, and I have moved mine into the mini-greenhouse where my aubergines and West Indian gherkins are already thriving. Oh, how I dream of my very own polytunnel... On another note, just like mulch can help in drought conditions by preventing evaporation, it can help in wet weather by absorbing some of the water before it reaches the soil. Use an impenetrable mulch such as plastic over the roots of waterlogged plants, or something absorbent such as straw or newspaper as a general cover, and pull it back on sunny days to let things dry out!

5 - Defend against pests and diseases
Keep on top of pruning, staking and mulching to keep plants off wet soil and improve ventilation - this will lessen the risk of fungal diseases. And be prepared for slugs and snails, which thrive in wet conditions. Hand-picking, beer traps, barriers of copper/tinfoil/eggshell/ash/sand, decoy plants (French marigolds are good), wheat bran, nematodes and organic pellets are all methods worth considering, and a combination of several of these is best! Encourage natural predators such as ground beetles, amphibians, hedgehogs and ground-feeding birds (thrushes, robins, blackbirds, starlings) by providing food and undisturbed habitats for them. Perhaps there is an opportunity to alter your landscaping to draw excess water to a pond or bog garden, and make the most of the excess water to encourage wildlife! Slugs also struggle to feed on high-up plants, so climbing plants are less at risk, as are those on roofs and windowsills.


6 - Pollinate
Rain keeps pollinating insects at home indoors, and pollination of my tomatoes in particular has been very poor so far this year. Tomatoes and peppers are self pollinating and only require a shake or a flick on the back of the flower to pollinate them. Others can be carefully hand-pollinated using a soft paintbrush.

What about you? How do you plan to improve things for your crops if next season is as wet and gloomy as this one?

Monday, 9 July 2012

Great Garlic

My garlic harvests to date have always been rather pathetic - small bulbs and few of them. But this time round I tried overwintering my garlic - planting it last autumn and harvesting, well, now, and I added a sprinkle of onion fertiliser to the soil before planting to give it a bit of a boost. It's been a great success!

The garlic (Provence Wight) grew strongly from the off and looked great by spring. Despite a bit of rust (no doubt exacerbated by the wet weather) they've been going for it all season, until recently when the leaves began to die off, signalling harvest time.

 
Digging veg up in the mud is never pleasant, but it became clear there was no point waiting for dry weather... When the sun came out late yesterday afternoon, we went for it.

Twenty minutes later, it was pouring again. Hmph.


But we were there by then, already getting drenched, so we dug the garlic anyway, and brought it home caked in mud. There were a few losses - some were just rotten and pests had moved in, others were pathetically small for reasons unknown. Some lost their protective skins as I dug them up and the stalk pulled off - is this because I left it a bit late to dig them, or because of the wetness and rot, or a combination?


But the vast majority are big, plump, firm, healthy bulbs - by far the best result I've had with garlic. Lots of them have a white mould on the outside - my first thought was the dreaded white rot, which I know I have in my soil - but the bulbs seem otherwise big and healthy and have good strong root systems so I guess that's not the case. Hopefully it'll just go away as they dry.


The whole house stinks of them!

After a couple of days indoors for the worst of the mud to dry off (I'm going to move them to a wire rack to improve ventilation), I'll hang them in the summer house to dry for a few weeks, then trim them and clean them for storage. I'm a garlic fiend, but this lot should keep me going for a while!

Tuesday, 10 April 2012

How to Grow Tomatoes - 10 Simple Rules

I write this primarily for several friends who have taken, or are about to take, spare tomato plants off my hands and who have asked for full instructions on how to look after them, but hopefully lots more people will find it useful too! For some it can be daunting growing things for the first time, or growing things you've never grown before, but really most plants' needs are very simple and as long as you know what those needs are, it doesn't have to be daunting at all!

Here are the needs of a tomato plant:
  1. Warmth. Keep above 5C, preferably 10C, and only plant outside when the risk of frost has passed.
  2. Sun. Always keep them in a sunny location. 
  3. Good compost, which provides nutrients and retains moisture.
  4. Support (except with tumbling types), to help the plant bear the weight of its fruit.
  5. Dryness. Avoid getting the leaves wet where possible. A greenhouse is ideal but not by any means vital. Good pruning promotes air circulation which will help plants to dry quickly.
  6. Pollination. Outdoors, bees will do this for you. Indoors, just shake the flowers!
  7. Regular watering. Fruits need lots of water to swell, and irregular watering can cause fruit to split, so water the same amount every day as far as possible.
  8. Food. While not vital, applying tomato feed once a week can get you a better crop.
  9. Pruning. Pinch out extra shoots or 'suckers' from leaf joints to provide good air circulation and focus energy on fruit-production.
  10. Protection from fungal infection. Remove any leaves that drag on the soil and any that show signs of disease. Consider using a fungicidal spray (bought or homemade - see below) to protect your plants during humid weather.

That's really all you need to know, but if you want more, here's the long version...


Sowing Tomatoes

Tomato seeds need heat to germinate and must be sown indoors, anytime from January to early April, and kept above 10C. Fill small pots (3" is ideal) with clean, new compost, firm it down gently and water it. Then use your fingertip or a pencil to poke a shallow hole, 3-5mm deep, in the middle of the soil in each pot. Drop two seeds into each hole and add a pinch of fine compost or vermiculite to fill it in, or simply 'pinch' the hole carefully closed. Place in a propagator or cover the pots with plastic wrap to retain moisture until the seedlings have appeared - or simply water very lightly with a spray bottle twice a day to stop the surface drying out.

Seedlings will usually appear within a week, and definitely within two. Remove the plastic covering as soon as you see them and keep seedlings in a sunny place - if they don't have enough light they will reach for more and grow very tall and 'leggy' very quickly, which will give them weak stems unable to support the plants properly. When the temperature is above 10C during the day, it's ideal to put them outside in full sun, but keep them out of strong winds and heavy rain/hail showers until they're bigger, and don't forget to bring them in again at night! If two seeds have germinated in the same pot, wait until they grow their first true leaves then select the stronger one and pinch the weaker one off at soil level.

If you prefer, you can sow into smaller pots, cells, or a seed tray. When the plants are big enough to handle, though, they should be carefully transplanted to larger individual pots.

Ready to plant out...


Planting Out

Tomatoes don't like cold temperatures and frost will kill them, so keep them protected from cold but in plenty of sun until the risk of frost has passed. If you will be growing them outdoors, check the last-frost date in your area and wait until then before planting out. In my area, it's early- to mid-May. But if you plant them outside and then a late frost is forecast, don't panic - covering your plants gently with newspaper, a sheet or a towel (don't squash them!) is often enough to protect them. If you're going to be growing them in a heated greenhouse or conservatory, you will be able to plant them out much earlier - as soon as night temperatures in it are reliably around 10C. Plants should be at least 6"/15cm tall before planting out, and you should 'harden them off' for 7-10 days by putting them outside during the day, to gradually get them used to outdoor temperatures and winds.

Like virtually all fruiting crops, tomatoes need lots of sun, so pick a spot for them that gets at least six to eight hours of direct sun a day - the more the better.

I think the easiest way to grow tomatoes is in a growbag, and you can now get growbags specially formulated for growing veg in, which I highly recommend. Roll the growbag on its side to break up the compacted soil, put it in position, then cut holes for your plants and scoop the soil aside to make holes big enough for the tomato plants. Water your tomatoes before planting out to reduce stress, and try not to expose the roots to direct sunlight or leave them sitting around out of a pot for any longer than necessary. Pop them in the holes in the growbag, level and firm the soil around them, and water the growbag well.

See all the little hairs around the bottom of the tomato plant stem? If you plant it deeper than it was before, those hairs will grow into extra roots and give you an even stronger plant!

Tomatoes can also, of course, be grown in pots or in the soil in your garden - just make sure you use good compost to provide nutrients and retain moisture. Plant them around 12"/30cm apart.

Stick a cane in the ground as close as you can to each stem without damaging the roots. This is tricky in growbags as they are not very deep - try sticking the cane right through the bag into the ground, or check out the various types of cane support you can buy or make. As the plant grows taller, tie it loosely to the cane every 9-12" to support the weight of all that lovely fruit you're going to get! Another way to do it is to fix a stake or post every two or three plants, and tie strings between them that pass both sides of the stems. Look up 'Florida weave' for examples of this.


Caring For Your Plants

Uneven watering can cause fruit to split, so try to water regularly. Even in heavy rain, growbags and pots don't tend to catch that much water, so while your plants are fruiting, water them the same amount every day or two, whatever the weather. Growbags can be tricky to water - it sometimes just runs off. I remedy this by cutting the bottoms off plastic bottles and burying them neck down in the soil next to the plants - watering into these takes water straight to the roots where it's most needed, and allows the water to soak in gradually rather than running away.

  Splitting caused by irregular watering.

Many gardeners apply a tomato feed every week or two starting from when the first flowers open - this will encourage maximum fruiting. Using growbags already formulated for tomato-growing, I find this unnecessary, but who knows, maybe I'm missing out on an even bigger crop! Seaweed extract treatments are also particularly good for tomatoes.

Most tomato plants need pruning to keep plants focussed on fruit-production. (If your tomatoes are 'determinate', bush or tumbling varieties, they do not need pruning, but the ones I have given my friends are 'indeterminate' which means the plants will just branch out more and more, endlessly, so pruning is important.) Don't panic - it's very easy! What you're aiming for is a straight upright stem with only leaves, flower trusses and fruit trusses growing from it, like this:


When you see an extra shoot, or 'sucker', forming at the base of a leaf, like this...


Just pinch it off, like this...


If you do this carefully and don't damage the hairs on the stem, you can plant these prunings in pots of compost and grow whole new plants! (They may look like they're dying to start with, but they'll bounce back with a little TLC.) If you don't remove these extra shoots, your plant will end up with lots of extra branches and lots of extra leaf growth, will become tangled and unmanageable and will make your plant more susceptible to fungal infection...

Tomatoes are prone to a fungal disease called tomato blight, especially when grown outdoors, which starts as spots on the leaves, spreads to the stems and will eventually turn the fruit black. Rain carries airborne blight spores down to the leaves and soil, and the infection sets in during hot, humid spells. To decrease the chances of disease, try not to get the leaves wet when watering, and keep plants pruned so that they are well-ventilated and dry quickly after rain. If the lower leaves hang down to touch the soil, snip them off, and if any leaves turn yellow or develop brown or black patches, remove them too. Don't spread infection by touching infected parts and then touching non-infected parts, or by letting an infected plant touch others. If you think your plants may be infected, or during a period of more than 48 hours of hot, humid weather, spray your plants with a 1:1 milk and water solution, or 3 tbsps bicarbonate of soda and 1 tsp washing-up liquid to a gallon of water, to raise the alkalinity of the leaf surfaces and make it harder for fungi to take hold - or of course you could use a chemical fungicide. You can do this every week and after rain to prevent blight, or more often to slow its progess once infected. Spray in the evening or early morning, and always out of direct sunlight. Blightwatch.co.uk offers a free service to warn you when the weather conditions are just right for blight to hit your postcode so you can take precautions - give it a try!

 When black patches reach your plants' stems, you know it's blight.

If your indoor tomatoes are attacked by whitefly, grow basil around them - the flies hate it. Outdoor tomatoes don't tend to suffer much pest damage, but keep an eye out for slugs, snails, caterpillars and aphids just in case. Encouraging ladybirds in your garden is the most natural way to deal with aphids, but squishing them by hand is also very effective. Slugs, snails and caterpillars are best dealt with manually too - you'll need to go out after dark with a torch to catch slugs and snails - or you could use beer traps or organic slug pellets.

If you're growing tomatoes indoors, you will have to either open doors and windows wide during warm days to let pollinating insects in, or pollinate by hand. This is really easy - tomatoes are self pollinating, meaning they only need their own pollen to reach their own stigma, so it can be done simply by shaking flower trusses, flicking or blowing into the flowers, or by vibrating the flowers with the back of an electric toothbrush or an electric razor with the blade removed to mimic a buzzing bee! Do this every few days when flowers are opening. If you're growing outdoors, bees and other insects will do this for you. If you don't have many bees in your garden, you can attract them by growing more flowers! Here is a list of flowers which help to attract bees. Marigolds, poached-egg plant, poppies, borage, sunflowers and cornflowers are particularly good and easy to grow.


Harvesting

Harvest your tomatoes when they're fully red (if, that is, you're growing a red variety!), but try not to let any overripen on the plant, which may stall further fruiting. Keep your harvested tomatoes at room temperature - the fridge ruins their sweetness!

If you keep harvesting and pruning your plants, they'll keep producing right up until the first frosts around October or November. Enjoy them, and good luck!


And why not try saving your own seeds for more free tomato plants next year? Just click here and follow the instructions!

Monday, 2 April 2012

Born Blind

I recently noticed my Uchiki Kuri squash seedlings were not progressing equally; while one has dutifully produced a healthy first leaf and is making a start on its second and third, the other has no growing tip.


This is called a 'blind' seedling, and occurs from time to time (especially in curcubits, in my experience, but also in tomatoes, peppers, brassicas and virtually any other kind of plant), seemingly at random and for reasons unknown. It's a disorder or defect, rather than a disease. This blind seedling has no true leaves at all, but sometimes a seedling may develop just one true leaf and be left with no growing point, like the tomato seedling below, or even grow a full pair and then stop.


Sometimes, if you keep it going long enough, the blind seedling may sprout a growing tip after all, but it's much quicker and easier just to compost the plant and resow. And that is what I have done.

Wednesday, 24 August 2011

Summer Harvests

We've harvested our onions recently, and they're spread out to dry at home. A disappointing result, as usual, despite the fact I bought a 'giant' variety this year! There's definitely something lacking in our soil, despite the generous dressing of manure we gave it in the spring; next year I'll have to invest in some onion fertiliser.


I was also surprised that several onions suffered white rot as usual, despite the Armillatox fiasco... (On which note, I'm pleased to report that there is indeed no trace of the Armillatox in the soil now, and no smell or taste of it in the onions! However, I won't be bothering again since it doesn't stop the problem...) Perhaps I'm wrong and it's not white rot but just a few weak plants going bad, but they do seem to have all the right signs; yellowed leaves, white mould underneath, and weak or rotten roots.


Our shallots (on the right above) and garlic are harvested now too - it's a pretty good garlic crop, and there are more to come, although a few bulbs seem to have disappeared!


We've dug up our first few potatoes, and boy, was I surprised! I was pretty concerned about them because when we returned from our holiday the foliage had all died down and I hadn't seen a single flower! I guess I just wasn't paying attention...


These are Kestrel - a 'second early' variety that's particularly good for roasting, baking and mashing. They've got some pretty bad scab in places, but it's only cosmetic. We scattered some potato fertiliser from the Organic Garden Catalogue over the bed before planting and it looks like it did its job! These babies weigh up to 360g each!

Fat hen swallowed our French bean bed while we were away, but as we weeded we found a great crop of beans hiding in the jungle. We also found a surprise late handful of broad beans when we cleared the plants - I thought they were finished ages ago! I pureed them with some lemon juice and a spoonful of fat hen pesto, spread them on toast and topped them with cheese for lunch one day. Mmmmmmm.


And we're now harvesting our runner beans. The beans are setting well in this damp weather and there are hundreds of them! But somehow I don't think we'll be winning any shows with these crazy shapes...


Thursday, 4 August 2011

Garden Update

Okay, okay, here I am. I've been back from our holiday in Whitby a week and a half, but very busy focusing on a writing deadline, so here's a belated update on what's been going on in the garden.

I was delighted when we got home from Whitby to find the cucumbers finally appearing. After a few disastrous cucumber-growing attempts, I sought out some 'Moneta' seeds - my favourite variety, but hard to find (I finally got them from Germany!) - and they're doing me proud. I'm watering hard to try to avoid any bitterness in this hot weather, and will be picking later today...


The tomatoes are doing fabulously well and are sooo delicious. We're getting at least a good handful most days now. The leaves of the 'Hundreds and Thousands' have been yellowing and showing black spots since mid-June now. I've pruned, I've sprayed milk, I've sprayed chamomile, but now the tell-tale black patches are appearing on the stems it's clear they've got blight. I'm just glad it's taken so long to progress!


There's still no sign of damage to the fruits so I'm just gonna keep harvesting for now, hope for the best, and try to prevent it spreading to the 'Angelle' tomatoes which are looking much healthier. Last year I raved about how easy-to-keep the Angelle plants were, because they didn't put out any suckers. Well, turns out they do when they're planted at the proper time in the proper amount of properly-nutritious soil... They're growing like crazy and I can hardly keep on top of pruning! The whole lot fell over the other day, the plants got so heavy, and I had to restake them. However, despite their luxuriance, they haven't minded one bit being planted six-to-a-bag.


I'm also pleased to see the first green peppers swelling. We've got a bit of a pepper experiment going on this year, with a few different varieties, so I can't wait to see how they all do... I think this one is 'King of the North' - the same as we grew last year.


Sadly our French beans, which started off so well, are having some trouble. They're empty!


The pods are just flat and sort of limp - and going purple, which this variety does not usually do. They're still edible, but not nearly so good to eat. I can only imagine the problem is poor pollination, but I don't understand - they're only a few feet from the tomatoes, and they're obviously getting plenty of attention. Our garden is buzzing with bees and hoverflies! So what's gone wrong? Perhaps they're planted too close together and the insects just aren't finding the flowers. I wonder if there's time for a second sowing...

Tuesday, 5 July 2011

Nearly...

It's nearly time to pick our first outdoor tomatoes... Exciting!


There are still lots of discolouring leaves on the plants. Yellow ones, and ones with brown or black spots. It stopped for a bit in the very hot weather, but now it's spreading again. I have no idea what it is - I still don't think it looks like blight - so I can only cross my fingers and hope for the best...

The Hundreds and Thousands tomato plant has soooo many flowers and green fruits on it. I've counted up to eighty on a single branch!


If they all ripen at once I don't know what I'll do!

Sunday, 26 June 2011

Signs of Trouble

I've been spotting a few problems arising in some of the plants in the garden during the last month or so. It always seems to happen as summer hits us - I guess warm, humid weather is the best time for pests and disease to thrive.

The sorrel is full of leaf-miners - you can see three wormy grubs inside the left here on the right. Apparently the parent - a flying insect of some sort - lays its eggs on the edge of the leaf, and the grubs burrow straight inside to feed.


It's not a problem I've had before, and there doesn't seem to be anything I can do except pick and destroy the affected leaves (or net the whole plants, but that ain't gonna happen). Any tips, anyone?


The French beans are well on their way now - I'll be picking the first this week - but several plants have discoloured leaves and I really have no idea what it is. Some look like this...


And some look like this...


The plants seem to be in great health otherwise, but it's hard to know whether this is the start of something bad, or nothing to worry about!

Some of the courgette leaves are yellowing badly - another problem I've never seen like this before.


And the 'Hundreds and Thousands' tomato plants have some very yellow leaves in the middle too, and some black spots. We surely haven't had the right conditions for blight yet. I'm thinking maybe it's some kind of leaf-spot...?


Can anyone can help identify any of these problems?
Related Posts Plugin for WordPress, Blogger...