Showing posts with label pests. Show all posts

Sunday, 4 January 2015

2014

It's easy to think that winter is a quiet time for gardeners, but there's plenty to be done. Between harvesting winter crops, checking fleeces and stakes, winter digging, construction projects and maintenance, nurturing overwintering plants and looking after little seedlings in the greenhouse, there's also plenty of planning to be done, and it inevitably involves a good look back over the past growing season to see what worked and what didn't.

2014 was a pretty bumper year for us, but there are always lessons to be learned. Our plot was under a couple of feet of floodwater for a week early on in the year, but thankfully it didn't do any real damage or set us back - we just had some extra clearing up to do, and to be patient in waiting for the soil to dry out again. We've settled on a new 'structure' for our plot, with three main beds in a rotation plus a number of perennial areas, and we made several new paths. We failed to cultivate the difficult far corner of the plot or our old strawberry bed, but we did clear them and cover them up to stifle the weeds and make the job easier later. We planted a new perennials bed with asparagus, artichokes, strawberries and herbs - hopefully some perennial kale will go in here too. We built new compost bins in a new area, and grew beans on the super-fertile patch where the old bins were. We also upped our growing game in the garden at home, converting a shrub bed to grow vegetables and adding three raised beds - more on all that in another post.

2013, compost bins. 2014, French beans. 2015 greenhouse!
We tried a new way of adding fertility to our plot; the 'Complete Organic Fertiliser' recommended by Steve Solomon for rebalancing soil nutrients for maximum plant health and nutrition. Though I can't quantify the results or compare to a 'control' area, I have to say everything on the plot just grew better than ever with virtually no problems, and I am quite sure the COF helped that happen. I will be going one step further this year: sending some soil samples off for laboratory analysis and creating a custom mix to balance it even better.

Another thing we trialled was 'Rootgrow' or mycorrhizal fungi, endorsed by the RHS; a mix of natural fungi that forms symbioses with plant roots and gives plants access to more nutrients and water. It's primary recommended use is in planting trees and shrubs, to help them establish quicker and more easily, but it is supposed to help any plant so I used it under every single crop to see what happened. In theory it should drought-proof plants and help fruits and roots to swell more steadily and evenly. In practice, though we had great growth almost everywhere and the new asparagus and artichokes established without a hitch, my container potatoes gave identical yields whether I used the Rootgrow or not, the newly-planted strawberries didn't establish well for some reason, squashes and swedes came in a huge mix of sizes, and my celeriac completely failed to swell, so I'm not entirely convinced...

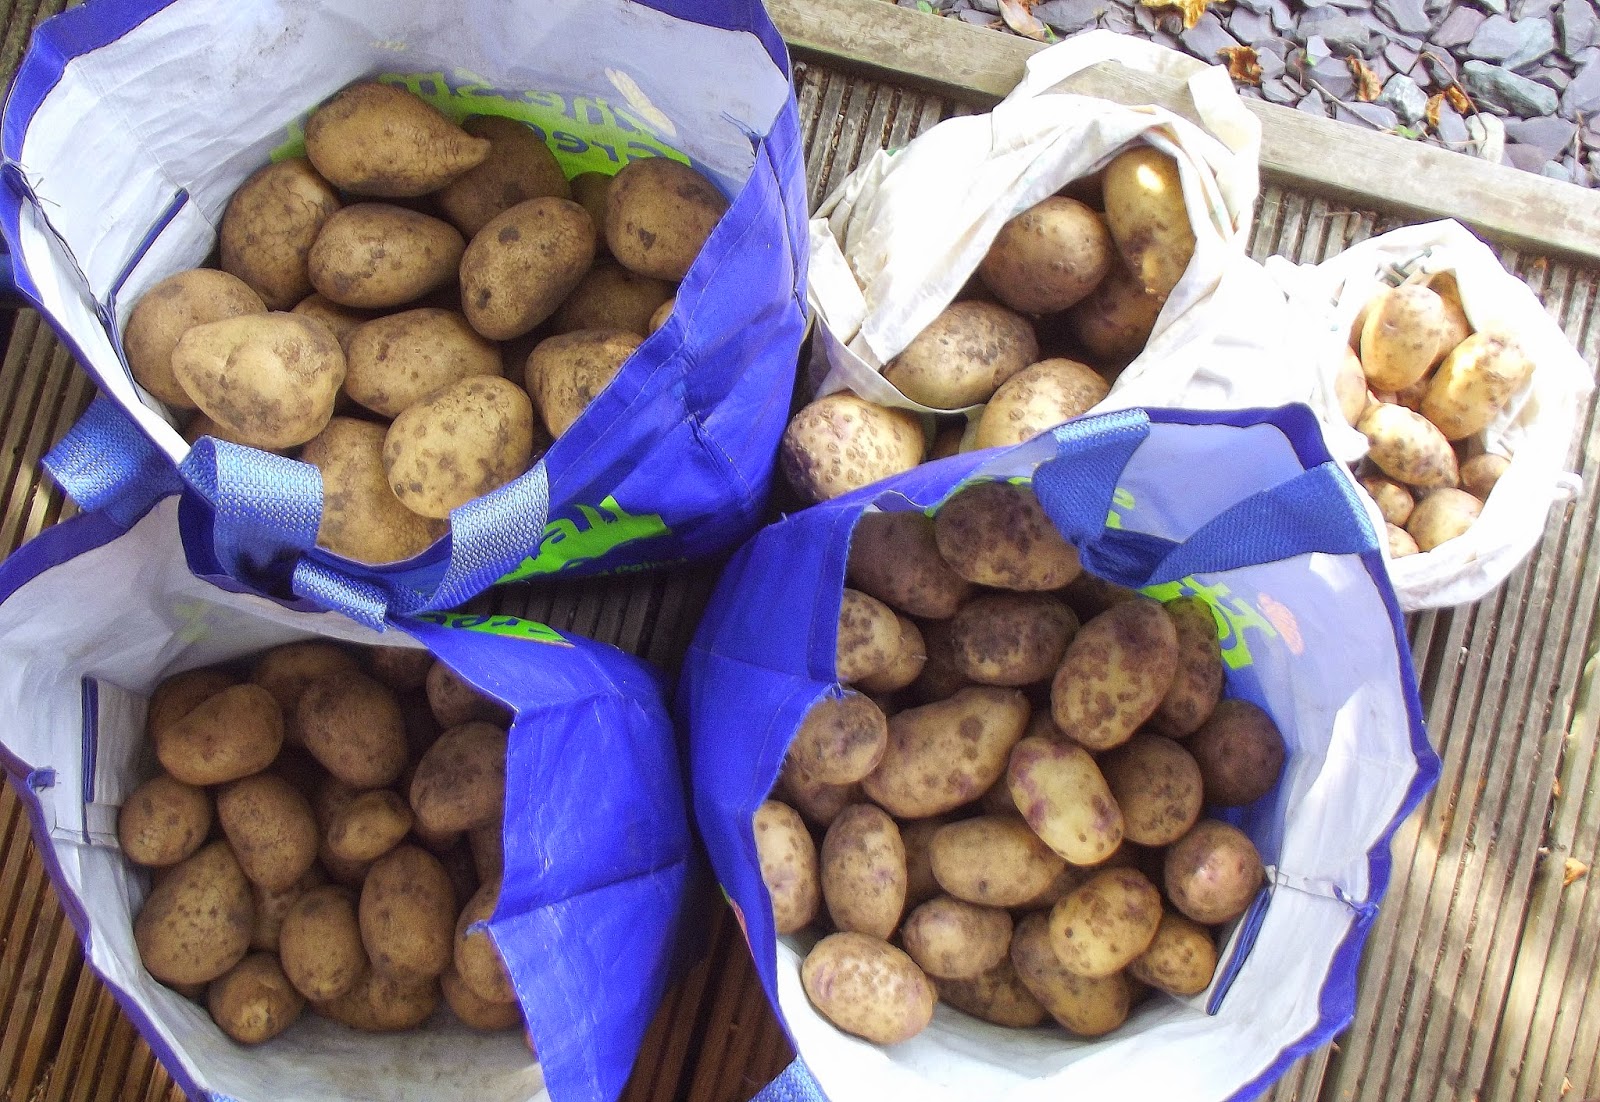
Potatoes did wonderfully - we managed to grow a kilo for every week of the year. (If only I had somewhere better to store them - they are now sprouting and turning soft). Scab was very bad on our old favourite Kestrel, but we also tried Pentland Crown this year, which makes a much better baked jacket spud, seems to store slightly better, and doesn't suffer as much scab, so we will be growing more of these in 2015! On reflection I wondered if I should have left the lime out of the COF applied to this area, as it probably made it worse.


Carrots were our best ever, even though we couldn't find our enviromesh in time to protect our first sowing so we lost some to carrot fly - our later sowings did brilliantly and they even won a first placing in the allotment association show! We have only succeeded with carrots since we added lime to our soil - perhaps they need the extra calcium.


Pumpkins and squashes did brilliantly too; we brought home 18 lovely fruits and many are still sitting around happily on windowsills and doormats waiting to be eaten. Arguably we might have expected even more squashes from our eight plants - some plants only gave us one or two fruits - but they suffered from quite a lot of weed competition... Turns out it wasn't such a good idea to undersow them with clover; clover actually gets quite big and unruly when it wants to!


Leeks, parsnips, swedes, broad beans and beetroots all got along just fine. Beetroots really are just THE easiest vegetable to grow - nothing seems to stop them. I only wish Eddie liked them better as I'm eating them mostly by myself. The leeks are suffering from some allium leaf miner and I think we should cover them with mesh next year. We only grew one variety of French beans - a local heritage variety called Ryder's Blue Coco - and I sowed them rather late due to a lack of space earlier on. They were delightful - really tender - and we were eating them long after our neighbours' beans had finished, but we couldn't save any seeds from them because they didn't have time to mature before the first frost, which was a great shame. I do have just a few seeds left so I MUST do better at this next year!


Our chard and winter spinach, planted out in late summer, suffered a bit of neglect due to an extremely busy autumn, but though we lost a few to slugs and snails, they grew superbly and we really should have harvested more from them before the winter. We will still be able to pick from them when growth starts again in early spring though. Our first attempt at fennel suffered the same neglect but also grew very well indeed, and again we failed to harvest it in good time. It's certainly one to try again this year though. We also have a few spring cabbages nearly ready which have done really well - a nice compact variety called Pixie which, assuming it tastes good come spring, I will certainly grow again.

2014 was our first year growing both celery and celeriac. The celery did okay, though it was a bit thin and stringy (I don't usually eat it raw much anyway - just use it for soups, stocks and stews - so that doesn't really matter). The celeriac was a huge disappointment; no root to speak of at all, and I'm not sure why or what to do differently next year...


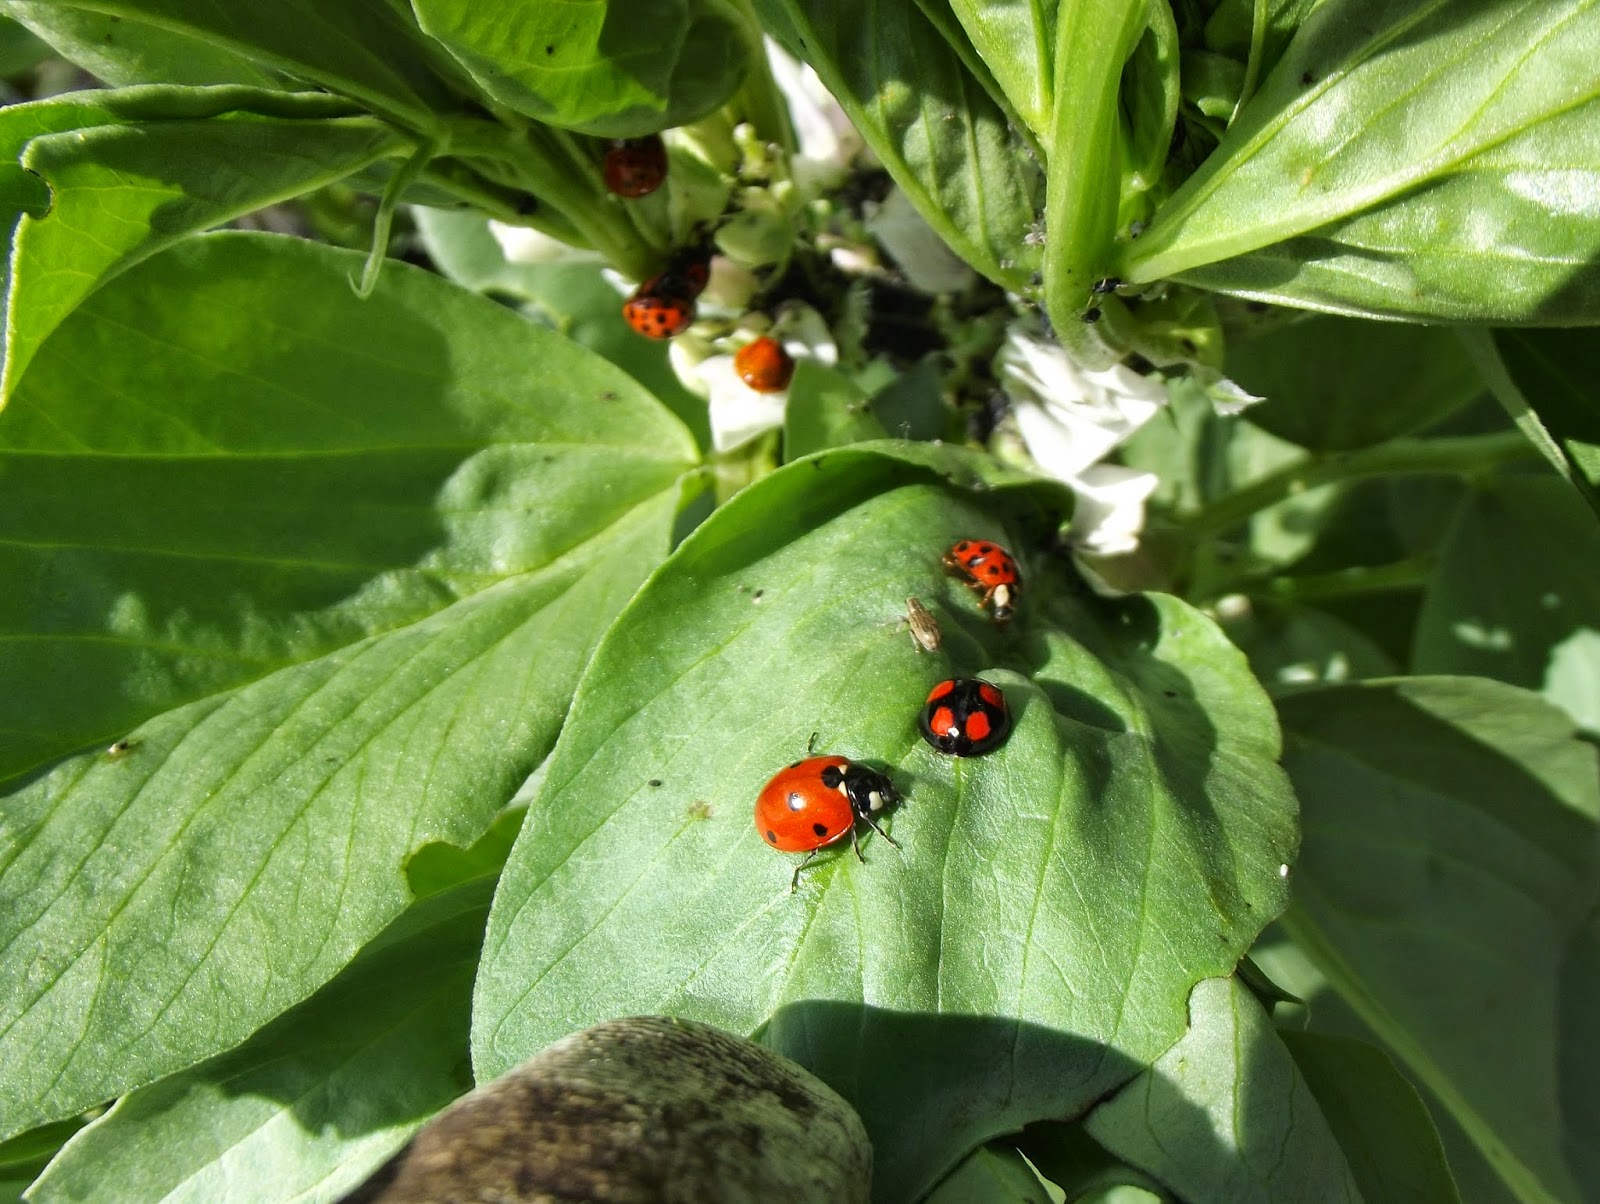
The importance of beneficial insects really, properly hit home to me last spring when scores of ladybirds descended on our blackfly-infested broad beans and cleared the whole lot up for us. I'm pretty sure there were more ladybirds around than before because I'd grown phacelia in the next bed over winter - ladybirds seem to be attracted by lacy foliage and as we cleared it up in the spring there were loads of them among it. I always grow a few flowers here and there, but now I will grow more!


In the home garden, our courgettes and tomatoes were just fabulous and kept me busy finding new ways to use them! The tomatoes succumbed to blight in the late summer, as they always do. We tried a local heritage variety of tomato - 'Ryder's Midday Sun' - but sadly didn't find them up to a good standard; the plants grew slowly, the tomatoes were watery and lacked flavour, and they were first to succumb to blight! Maybe they'd do better in a greenhouse... But while I'm very glad to have had the opportunity to try them, I'm not sure I have the space to persist with them. Cucumbers and salad greens in our new raised beds did not do well at all and I'm sure there was a problem with the soil - more on that in another post... Peppers did okay but gosh, they take so long to ripen! We were disappointed in a new variety we tried - 'Hebar' - which had very thin flesh and not much flavour at all. The seller described it as "particularly sweet and tasty" so I'd love to know what anyone else thinks of them! We have bought a plastic greenhouse to put on the allotment this summer, which should be just big enough to grow a few tomatoes, cucumbers and peppers in. This way we hope to have blight free tomatoes and earlier peppers! We'll still grow some at home too though...

Kaibi Round, Ancho Grande, Hebar, Lipstick
The enviromesh over the kale bed got torn in high winds early in the year, and by late summer caterpillars had stripped the plants as I was too lazy to do anything about it... Thankfully some of the plants made a surprisingly good comeback though! Another mistake I will not repeat next year is planting French beans behind courgette plants. After the courgettes had been growing a month I couldn't reach the beans at all, and had to leave them all to pick for drying instead! The mangetout was great - we could hardly keep up with it - and we were really impressed by variety 'Carouby de Maussane' with giant pods! I have never grown ordinary peas, as frozen British peas are extremely good and convenient, and all the podding seemed like too much of a faff, but last year we did grow a multipurpose mangetout/podding pea - 'Ezeta's Krombek Blauwschokker' - and when they got too big to eat as mangetout I was forced to pod a few... They were so lovely that I might just add a few real podding peas to my garden this year...

Carouby de Maussane mangetout - still gorgeously sweet and tender at this size!
The 'perennial salad mix' from Suffolk Herbs turned out to be a mix of chicories and radicchios, which have grown well but... I just don't really like the taste. Admittedly I should have read the back of the pack more carefully, but this picture is a bit misleading I think!


All in all, we will do much the same this year as last, but here are the things we plan to do differently:
  • Grow more flowers - to include a cutting-flower patch!
  • Do even more to balance our soil nutrition according to Steve Solomon's great book 'The Intelligent Gardener'
  • Add a plastic greenhouse to the allotment to grow a few summer veg under cover.
  • Don't plant anything behind courgettes!
  • Improve raised bed soil.
  • Buy more enviromesh, to replace torn piece and cover leeks too.
  • Keep squash bed weed-free - perhaps mulch beneath plants - and grow fewer plants so they don't get so tangled.
  • Grow some proper peas, perhaps.
  • Try harder with celeriac.
  • Grow more Pentland Crown potatoes and less Kestrel - and try another new variety too.
  • There are always new varieties to try; this year new ones for us include oyster leaf, beefsteak plant, pink banana squash, skykomish tomatoes (supposed to have some blight resistance), marconi rosso peppers, and we're going to attempt to grow cauliflowers for the first time, since we buy them quite a lot...
  • We also plan to plant a new fruit patch on the long-neglected and difficult far corner of the allotment, and clear and replant our overgrown herb bed.
Frosty radicchio

Tuesday, 23 September 2014

Crop Rotation Confessions...

I have a confession to make. Crop rotation on a small plot has always rather baffled me. On a big plot it makes sense - on a big plot you can afford to leave a patch of ground empty in preparation for a later crop, or to sow a green manure in the middle of summer just for the heck of it - but on a small allotment where you want to make the most of every space all year round, it can be a real juggling act trying to get your potatoes out early enough for your purple-sprouting broccoli to go in, or clearing your onion patch in time to sow beans and corn, or figuring out what on earth to grow after you've harvested your squashes as late as October - and who uses exactly the same amount of space for every crop group anyway??

Traditionally, the main groups in a crop rotation are potatoes and roots, brassicas, beans, and 'other veg'. The potatoes are manured to enrich and slightly acidify the soil (preventing scab), heavy-feeding beans follow in the nicely broken-up ground after the potatoes are dug, then (often after an application of lime,) leafy brassicas to make good use of the nitrogen the bean roots accumulate. Then, presumably, you throw sweetcorn, cucurbits, tomatoes, leafy greens and everything else in together after that. Sounds simple enough, but questions abound. Do you grow swedes with the root crops or the brassicas? Aren't tomatoes in the same family as potatoes? Cucurbits take up way more space than anything else! And aren't you supposed to avoid manuring carrots?

I don't know, maybe I overthink these things - maybe I'm just too keen to abide by all the rules and to do it "right". But I think, after eight years on our allotment, I've finally cracked it!

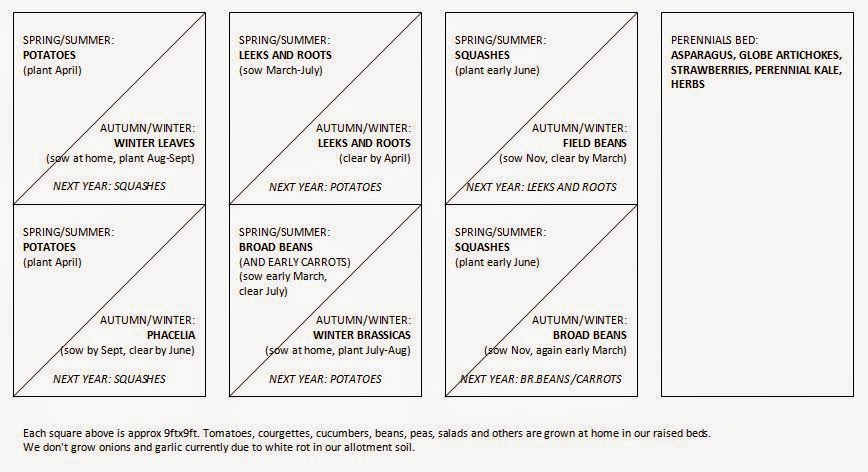
This is partly thanks to slimming down the number of crops we grow on the allotment anyway - we don't grow onions and garlic due to white rot spores in our soil, and we prefer to keep salad leaves and quick-ripening summer crops like French beans, courgettes and tomatoes at home so we can pick them more regularly. On the allotment we grow the lower-maintenance stuff: potatoes, squashes, root veg, broad beans, leeks, and a limited amount of winter brassicas and spinach-type leaves (plus some perennials in a permanent area). We've grouped broad beans, leeks and root veg roughly together: together they take up about the same amount of space we use for more space-hungry crops (potatoes and squashes), and it means we can follow our broad beans (which finish around midsummer) with winter brassicas, thus keeping our earlier-sown swedes in the same area as our other brassicas.

Ladies and gents, I give you our brand new crop rotation plan! (Click pic to enlarge.)


This rotation also allows for two squares to be sown with green manures over winter to add high-nitrogen organic matter to the compost heap, shelter wildlife and protect the soil. Phacelia and field beans are my two favoured green manures since field beans add vital nitrogen to the soil and can be sown as late as November, and phacelia attracts lots of insects and can be sown as late as September. Following squashes with winter-hardy beans means the timing for sowing is perfect; likewise with the winter leaves following the potatoes, and the winter brassicas following the broad beans. And even though we grow most of our beans at home, our allotment soil still gets a nitrogen injection thanks to the broad and field beans. Of course, this rotation doesn't include everything and I should do my best to efficiently rotate our crops at home too, but those on the allotment are the most important ones to rotate: beans for nitrogen, potatoes which are prone to damage from buildups of slugs and eelworms, and brassicas which are susceptible to clubroot, a very nasty fungal disease.

So far it's all going swimmingly. The potatoes are out (an awesome 28kg of Kestrel and 19kg Pentland Crown!) and the winter leaves are in; two rows of chard, two rows of winter spinach and a row of fennel (there's room for more, actually - I must do that). The squashes have finished a little earlier than usual, which means we have plenty of time to clear the soil for winter beans. The leeks, root veg, celery, spring cabbages, kohlrabi and pak choi are coming along nicely and we will slowly harvest them all winter long, making the most of all our space. Brilliant!


There is one complicating factor looming, in that we are planning to clear our old strawberry and asparagus beds (not shown in the plan above) over winter and put them to new use next spring. These two areas don't really fit into the plan so I'm a bit puzzled about what to do with them (and I rather wish we could move our pond and our apple tree into one, which would help us make better use of the other!). Should we grow runner beans or courgettes on the plot again after all? Shall I expand my collection of perennials? Is it time to give in and plant some fruit bushes? Good job I've got all winter to think about it...

Friday, 27 June 2014

Score One for Permaculture

When you think of organic growing, there are a lot of things that might come to mind. You might think of nasty organic pesticides such as pyrethrum or diatomaceous earth; you might think of arduous slug-patrols and endless couchgrass; you might think of sterile white insect-proof mesh covering up beautiful rows of crops. But the best method for growing organically, in my opinion (though slug patrols and insect-proof mesh certainly have their places!), is to work in harmony with nature as much as possible - the permaculture way; sustainable and low-maintenance - and we've seen a great example of this on our plot over the last month.

One important factor when it comes to growing in harmony with nature is simply to give plants the right conditions to promote great health, and that means sowing at the optimum time so that plants don't have to struggle. As much as I like the idea of sowing broad beans in autumn so I can pick them super-early the next season, experience has shown this never turns out well on my plot and the plants get absolutely ravaged by pests come April. Broad beans sown from March onwards, however, seem to grow up stronger and have almost no pest problems.

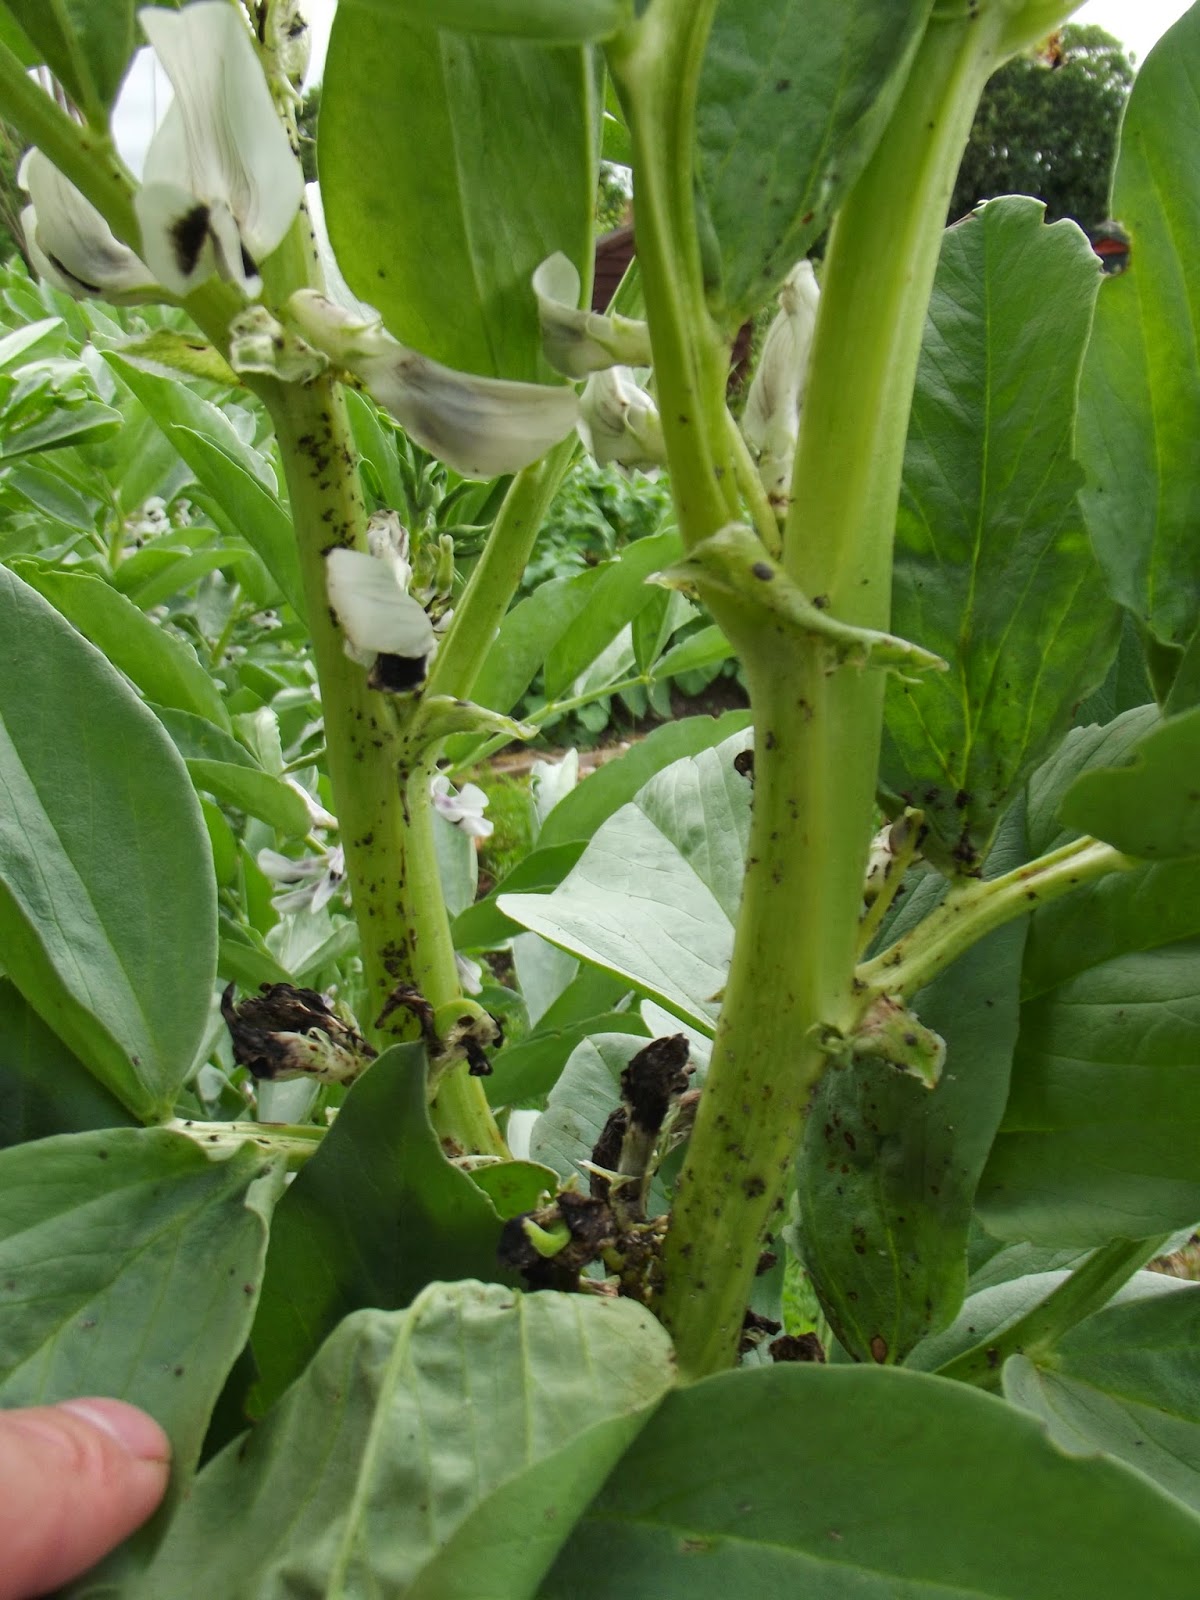
Nevertheless, sometimes the unexpected happens, and a few weeks ago we noticed the stems of just a couple of our broad bean plants were absolutely covered in blackfly. I groaned, but then I looked closer...


There were ladybirds everywhere - at least 15 on the most affected plant - and many of them were busy mating or laying eggs. Knowing that adult ladybirds eat up to 1000 aphids per day, I didn't see much point rushing to squish all the offending aphids or pinch off the tops of the plants! I just left them to it...


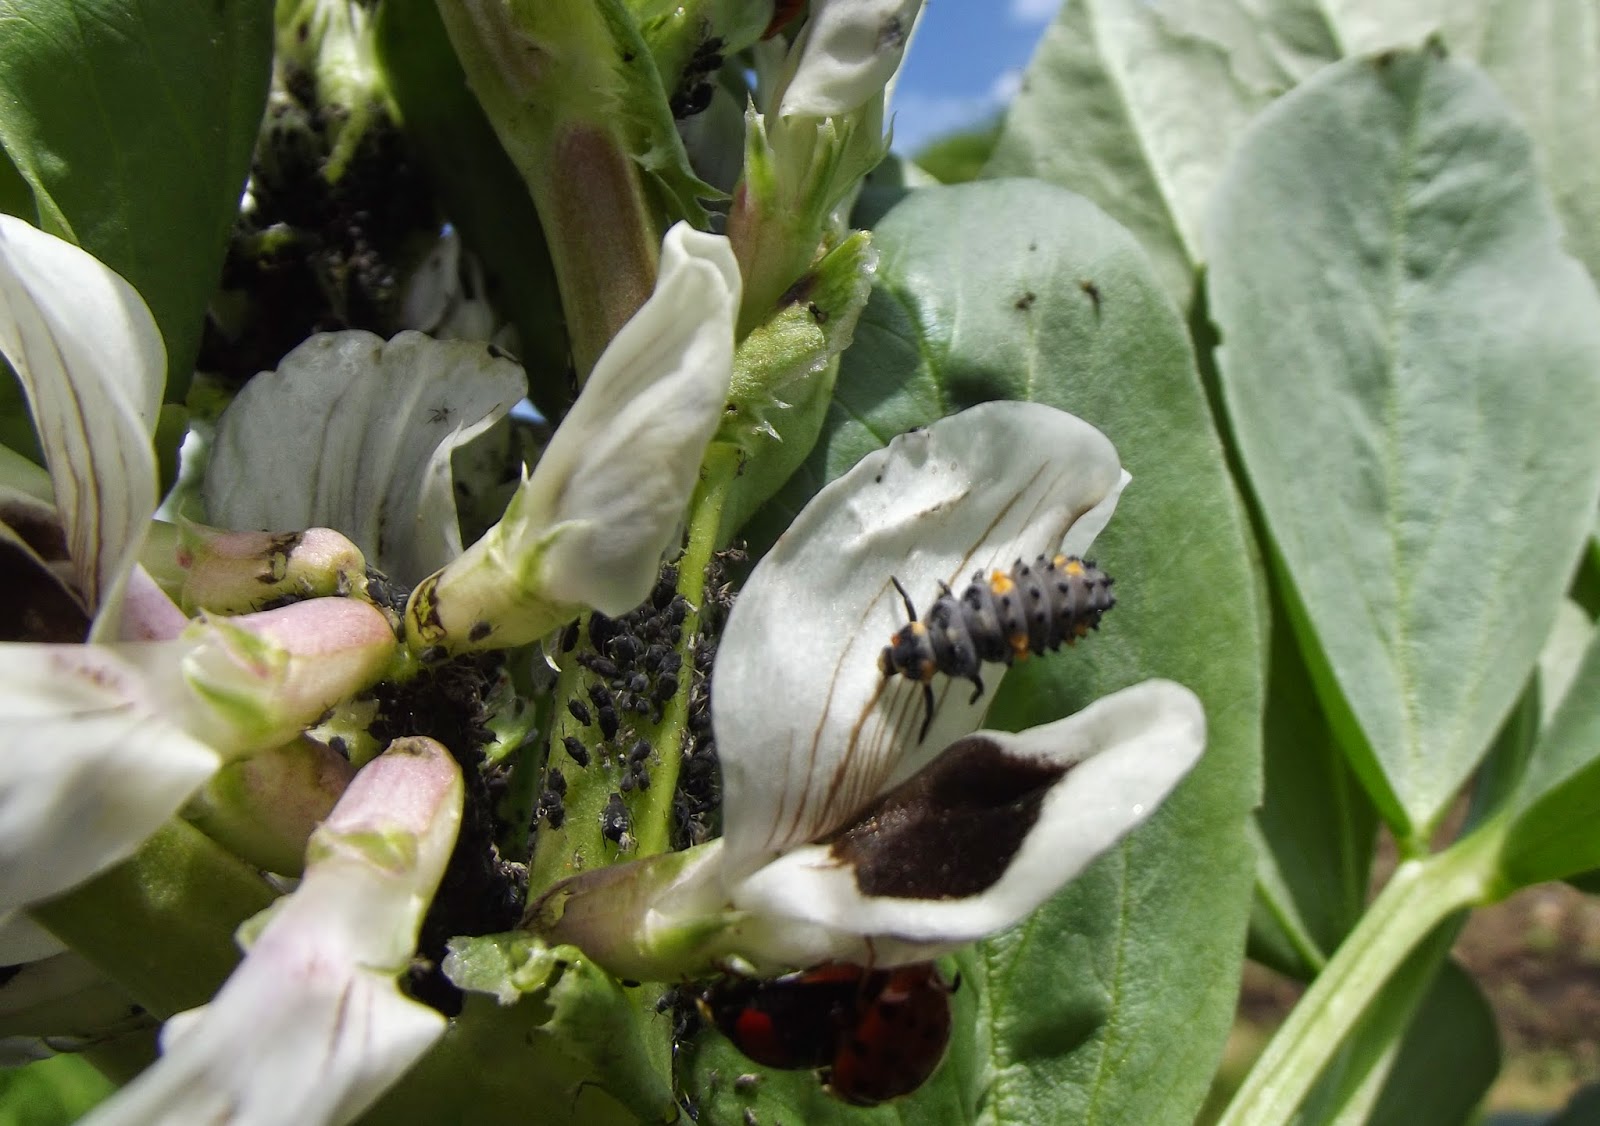
A week or two later there were plenty of ladybirds still around, and lots of their larvae too...


And a week or two after that - no more blackfly! Just a few corpses remain on the stems, ants picking over them rather sadly, and the bean pods are well on their way. That's 100% pest control, with no spraying, squishing or other interference from us. Hurrah!

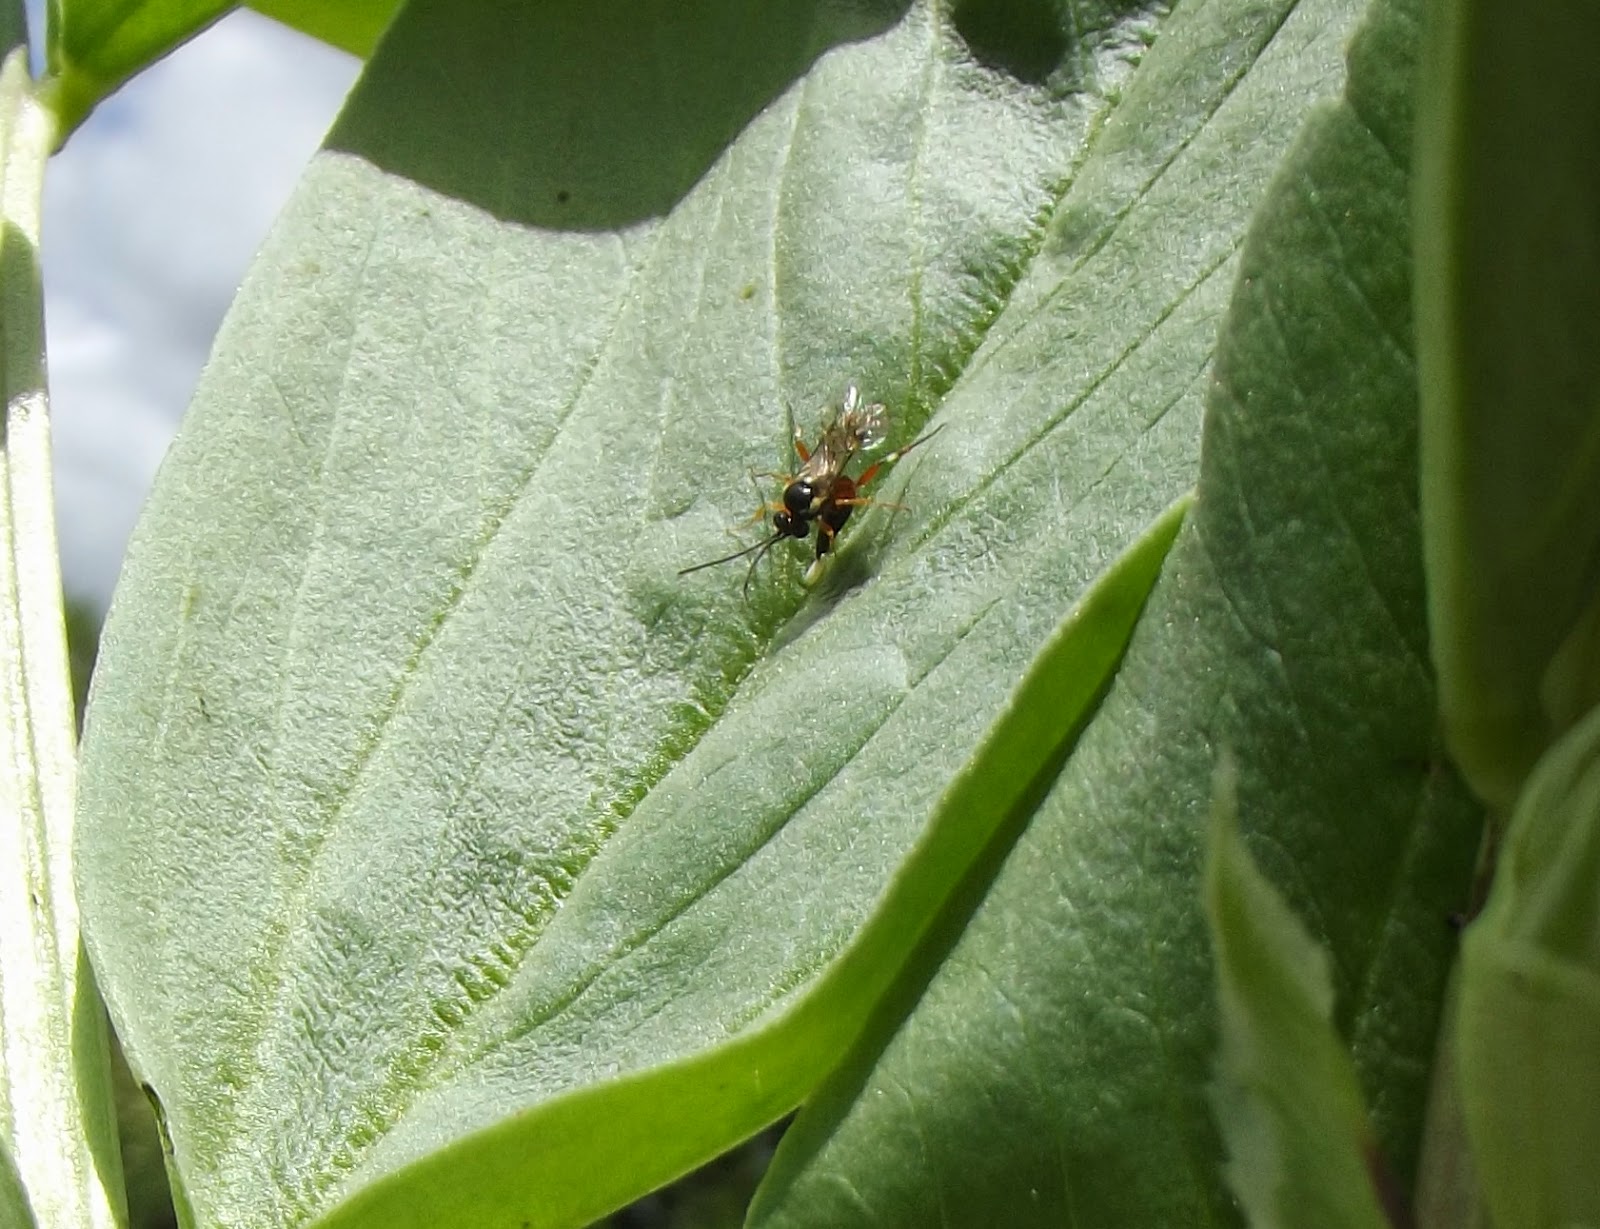
These broad beans are close to where we'd grown some phacelia as a green manure over winter - the phacelia was flowering by this point and covered with busy bees - and since ladybirds tend to like feathery-foliaged plants I presume this is what brought so many to the area. When I finally pulled the phacelia up I certainly found plenty more ladybirds sheltering there! A pesticide-free plot, no-dig beds, and plenty of sheltered places for insects to overwinter are helping make our plot even more hospitable to predatory insects such as these, and there are plenty of other plants we can grow to encourage them too; cosmos, dill, parsley, fennel, angelica, caraway, coriander and yarrow are all good choices which should be left to flower for best effect (slugs ate all my dill - boooo!) as well as flowering herbs such as mint, lemon balm and thyme. They're trickier to photograph, but there are definitely more little parasitic wasps on the plot this year too.

I love it when a plan comes together. Score one for permaculture!

Parasitic wasp laying an egg

Thursday, 12 July 2012

Six Strategies to Cope With Persistent Rainfall

At the beginning of the season I wrote about strategies for coping with drought and hosepipe bans. Hmm. Now, after two record-breakingly wet months, and amidst what is likely to become a third, I think it's time to start calling summer in Britain 'the wet season' and adjusting our practices to match, don't you? I've already talked about flooding, here, but what else can we do in future to improve the health of our plants when the sun don't shine?


1 - Look after your soil
Organic matter is a must for healthy soil; not only does it retain moisture to protect plants from drought, but it improves drainage too, by providing a more open soil structure. Dig it in early in the season, or spread it on top and let the worms do the work. Organic matter is even more important in heavy clay soils, which waterlog easily. To improve drainage even more, create a lighter soil by adding sand.

2 - Plan for good drainage
Raised beds are the ultimate in improved drainage for veg crops - assuming of course they are filled with good, well-draining soil. It can also be useful to plant on mounds or ridges. Aerate soil by spiking it to help drainage and drying. There is debate about whether crocks or stones in the bottoms of pots actually help or hinder drainage - scientists say they hinder it - but one thing we must certainly do is make sure there are enough drainage holes in our pots and make sure they stay clear. Raising containers off the ground on bricks or stones will also help. If you have a serious problem, consider a drainage trench or soakaway, filled with rubble or gravel, to carry water away. You can leave it open or top it with plastic sheeting and cover with soil.

3 - Restore nutrients
Excessive watering can leach nutrients out of the soil and leave plants hungry, so be sure to feed them regularly. Liquid feed, though, may do more harm than good in a very wet container! Blood, fish and bone is a great all-round dry feed which you can just sprinkle on the soil and allow the rain to water in gently, or work into the top few inches of damp soil. Rock dust is a highly recommended soil 'remineraliser', which I've just begun experimenting with this year - they say it improves plant health and yields dramatically... Seaweed is another good all-round plant-booster, that stimulates and strengthens plants against all problems. It can be watered in or used as a foliar feed on dry days.

4 - Protect your plants
I know I'm always whinging about not having a greenhouse, but this year it would have been more useful than ever. Cucumbers and gherkins dropped dead in the gloom and even cool-weather peas and asparagus grew painfully slowly. A little cover to intensify what few UV rays we've had would probably have been a great benefit. If this wet-summer trend continues, I think growing under glass or plastic will become more and more important, and I will certainly try to grow my cucumbers under cover after this year. Others that would benefit from it are tomatoes of course, French beans, peppers and chillies, strawberries and asparagus. Rosemary hates being wet, and I have moved mine into the mini-greenhouse where my aubergines and West Indian gherkins are already thriving. Oh, how I dream of my very own polytunnel... On another note, just like mulch can help in drought conditions by preventing evaporation, it can help in wet weather by absorbing some of the water before it reaches the soil. Use an impenetrable mulch such as plastic over the roots of waterlogged plants, or something absorbent such as straw or newspaper as a general cover, and pull it back on sunny days to let things dry out!

5 - Defend against pests and diseases
Keep on top of pruning, staking and mulching to keep plants off wet soil and improve ventilation - this will lessen the risk of fungal diseases. And be prepared for slugs and snails, which thrive in wet conditions. Hand-picking, beer traps, barriers of copper/tinfoil/eggshell/ash/sand, decoy plants (French marigolds are good), wheat bran, nematodes and organic pellets are all methods worth considering, and a combination of several of these is best! Encourage natural predators such as ground beetles, amphibians, hedgehogs and ground-feeding birds (thrushes, robins, blackbirds, starlings) by providing food and undisturbed habitats for them. Perhaps there is an opportunity to alter your landscaping to draw excess water to a pond or bog garden, and make the most of the excess water to encourage wildlife! Slugs also struggle to feed on high-up plants, so climbing plants are less at risk, as are those on roofs and windowsills.


6 - Pollinate
Rain keeps pollinating insects at home indoors, and pollination of my tomatoes in particular has been very poor so far this year. Tomatoes and peppers are self pollinating and only require a shake or a flick on the back of the flower to pollinate them. Others can be carefully hand-pollinated using a soft paintbrush.

What about you? How do you plan to improve things for your crops if next season is as wet and gloomy as this one?

Monday, 2 July 2012

Allotment update. Gah!


I'm finally starting to face up to the fact this is a bad, bad year for growing. Between torrential rain and scorching sun, and thanks to weeds thriving through the mild winter, we still haven't cleared enough earth to plant out our sweetcorn, beans, sunflowers and squashes, and they're languishing and potbound at home. Grass is taking over everything and slugs are eating everything else. We've had the worst asparagus crop ever, and the spring hail that blasted blossoms off fruit trees and bushes is going to mean a pretty poor fruit crop too. All my cucumbers and gherkins (at home) yellowed and died for reasons unknown - I suspect they just couldn't take the prolonged cold, wet, dull weather - cutworms (or something) mowed down 90% of my broad beans, and my shallots have inexplicably gone straight to flower without swelling to any kind of decent size.

At least the potatoes are doing okay.


The garlic is looking good and the onions are doing all right, albeit with rather liberal applications of (organic) slug pellets to try to keep it that way.


And despite a lot of slug damage and a few weeds as always, we're picking plenty of strawberries, which are always a joy.


We've achieved one of our allotment goals at least - we've finally planted up the corner patch we hardly ever use (hard, root-filled soil) with some artichokes, perennial cauliflowers and heritage kales - all planted through weedproof fabric to try to keep things under control...


I'm gradually covering it with stones to protect the fabric (it's gonna take a while!), and plan to plant some sage between the brassicas to try to keep caterpillars at bay - apparently cabbage whites hate the smell. I'll believe it when I see it...

At home, our tomatoes, peppers, courgettes, herbs, mangetout, chard and French beans are doing all right, I've resown a couple of cucumbers, and I might actually manage to grow some aubergines this year - they're loving the extra warmth of the plastic greenhouse - so all is not lost.


But I'm gonna have to accept we're just not going to get everything done on the plot this year. Sigh.

Tuesday, 8 May 2012

Rain, Rain, Go Away

Come on now, this is getting silly. I know we're in a drought situation (whatever that actually means) but we still need sunshine too, and the man on the telly said only winter rain could help us so your efforts are wasted. I swear most of my warm-season plants have just stopped growing - even the ones that didn't get smashed to bits by hail - and a few are just rotting in their pots, including the artichokes I spent good money buying. The slugs and snails are doing so well, in the meantime, that the remaining plants barely stand a chance, and after frost got my first early asparagus spears, the next wave has been so slow to grow without sunshine that most of it's been eaten before it's big enough to cut! Beans sown under fleece have not sprouted yet, and I strongly suspect they're rotten by now. There's a serious amount of weeding to do before I plant my maincrop potatoes and it's such a muddy job when the ground is practically waterlogged. I bought one of those weed wand thingies to burn the weeds but I can't do that when they're soaking wet, can I? Frankly, it's just depressing and uninspiring and motivation-crushing when the skies are grey and gloomy all day every day, and I'm not usually one to complain about the weather, but seriously, we don't usually have three (or is it four?) solid weeks of the same. Enough, okay?

Of course, I try to look on the bright side. The early potatoes and most of the herbs are doing well (except the rosemary which doesn't like to be wet), and the peppers and cucumbers in the relative warmth of the greenhouse are doing okay, if a little slowly.


The strawberries are pretty happy and green, with a few flowers appearing, and a couple I thought I'd lost to vine weevil have suddenly bounced back. The radishes, lettuces and mizuna are doing really well, too, although it's a constant battle keeping the slugs off them.


The tiny pots in which I've sown my brassicas are getting a constant watering where usually it'd be a fight to stop them drying out! And I have now harvested the first of my asparagus, even if it doesn't look very appetising.


Having battled with the allotment weeds for five full years now to virtually no avail, I've given up on digging and bought, as I said, a 'Weed Wand' to kill 'em all with. The environmental (and financial) cost of the gas canisters is not ideal, but as long as I'm economical with them and dispose of them properly, I think it's got to be better than either of the other options, which are using chemicals, or throwing in the towel. The cell-damage to the weeds is supposed to kill the whole plant, so I have high hopes that with this we'll finally be able to gain control, and it's going to be so much easier and less daunting than all that digging! Once the weeds are dry enough to start, anyway...


I'm also delighted to report the arrival of the year's most awaited seedling! After the hail killed all my ancho peppers - the ones I was most excited about growing - I sowed the last few seeds I had to replace them. And I waited... and I waited... and everything else I sowed came up but them. Finally, one has arrived! I hope more will still follow in the coming days.


At this time of year I'm usually starting to think about the likelihood of any further frosts and looking forward to planting things out, but everything's so far behind this year! So come on, rain. Enough!


Thursday, 19 April 2012

Vanishing Onions and Other Worries...

You may remember we gave winter onions, shallots and garlic a try for the first time this year, planting at the start of November with the hope of a bigger harvest with less white rot come midsummer. I bought a pack from Marshalls containing Yellow Moon shallots, Provence Wight garlic and Radar onions, sprinkled a bit of onion fertiliser before I planted, and it all seemed to go very well to start with.

About a month ago, after several weeks away from the plot, I noticed a lot of the onions had disappeared. Almost all of them in fact, despite the garlic and the shallots doing really well right behind them.


Where could they have gone?? There was no sign of slug activity, and no sign of them having been pulled out by birds (this is common when they're still very small, but you usually find the onions lying around on the ground).

It's a mystery, but Wilkinsons came to the rescue, as they often do. I picked up a bag of 'Turbo' onion sets for £1.48 yesterday and filled in the (rather large) gaps. They said plant out March-April, and hopefully the name is an indication of how fast they grow!

The just-sprouting broad beans are having pest problems at the moment too; I thought I had mastered this last year, but something has got in and cut down the new plants despite a web of string all around them!


Is this pigeons, mice, or something else? I'd always thought pigeons, but now I'm not so sure. Mind you, some of the strings making up the cage had moved a bit in the rain and wind, making some bigger-than-usual holes, so maybe a pigeon still managed to get in... It's particularly frustrating because I don't have any spare seeds. Doh!

Finally, I wonder if anyone out there can tell me what's wrong with these tomato leaves:


Little patches between the veins have thinned, leaving silvery-brown papery bits that look the same on both sides. I've seen sunburn through water droplets do this, but these plants are kept in the plastic greenhouse (during the daytime - indoors at night) and I've been quite careful to keep the leaves dry. My other guess is magnesium deficiency, but I'm not really sure... Answers on a postcard if you have any ideas!

Tuesday, 17 April 2012

The Evil Weevil

I've had a tubful of strawberry plants in the garden for three years now which has done very well. Early this spring, however, I noticed they were looking pretty unhealthy, so I thought I'd repot them, take them to the allotment where there's space for them to give me new runners, and replace them in the garden with some new everbearing 'Albion' strawbs I bought.

Look what I found when I dug them up.


The roots - or what was left of them - were riddled with vine weevil grubs; several per plant. These nasty grubs eat roots and can kill plants - and apparently strawberries are one of their favourites! They grow up into black beetles that just do minor damage to leaves - and go off and lay more eggs of course. We now suspect it might be vine weevils in this same area of the garden that killed a favourite shrub a while back!

So we ordered some vine weevil killer by Nemasys (fairly widely available from mail-order garden catalogues or Amazon). It's a biological control - a pack of live microscopic wormy creatures - nematodes - who eat larger grubs such as these vine weevil grubs! (You can get different types of nematodes for different pests too.)


There are fifty million nematodes in this here pack! You have to keep them in the fridge and use them within a couple of weeks, when the ground is moist. Then you mix them into eight big watering cans, water them all over the garden (this pack treats 100sqm! it's tricky to spread them that thin!), and then add more water on top to make sure they reach the soil.

I did it yesterday and phew, how I wished for a hose to do the final watering! After lugging watering cans around for nearly an hour my arm was exhausted! Maybe I need more exercise...

I'm glad to see it's raining this morning - hopefully that will help settle my wormy new guests in and give them an appetite.

Sadly I was too late to save the strawberries!


Tuesday, 10 April 2012

How to Grow Tomatoes - 10 Simple Rules

I write this primarily for several friends who have taken, or are about to take, spare tomato plants off my hands and who have asked for full instructions on how to look after them, but hopefully lots more people will find it useful too! For some it can be daunting growing things for the first time, or growing things you've never grown before, but really most plants' needs are very simple and as long as you know what those needs are, it doesn't have to be daunting at all!

Here are the needs of a tomato plant:
  1. Warmth. Keep above 5C, preferably 10C, and only plant outside when the risk of frost has passed.
  2. Sun. Always keep them in a sunny location. 
  3. Good compost, which provides nutrients and retains moisture.
  4. Support (except with tumbling types), to help the plant bear the weight of its fruit.
  5. Dryness. Avoid getting the leaves wet where possible. A greenhouse is ideal but not by any means vital. Good pruning promotes air circulation which will help plants to dry quickly.
  6. Pollination. Outdoors, bees will do this for you. Indoors, just shake the flowers!
  7. Regular watering. Fruits need lots of water to swell, and irregular watering can cause fruit to split, so water the same amount every day as far as possible.
  8. Food. While not vital, applying tomato feed once a week can get you a better crop.
  9. Pruning. Pinch out extra shoots or 'suckers' from leaf joints to provide good air circulation and focus energy on fruit-production.
  10. Protection from fungal infection. Remove any leaves that drag on the soil and any that show signs of disease. Consider using a fungicidal spray (bought or homemade - see below) to protect your plants during humid weather.

That's really all you need to know, but if you want more, here's the long version...


Sowing Tomatoes

Tomato seeds need heat to germinate and must be sown indoors, anytime from January to early April, and kept above 10C. Fill small pots (3" is ideal) with clean, new compost, firm it down gently and water it. Then use your fingertip or a pencil to poke a shallow hole, 3-5mm deep, in the middle of the soil in each pot. Drop two seeds into each hole and add a pinch of fine compost or vermiculite to fill it in, or simply 'pinch' the hole carefully closed. Place in a propagator or cover the pots with plastic wrap to retain moisture until the seedlings have appeared - or simply water very lightly with a spray bottle twice a day to stop the surface drying out.

Seedlings will usually appear within a week, and definitely within two. Remove the plastic covering as soon as you see them and keep seedlings in a sunny place - if they don't have enough light they will reach for more and grow very tall and 'leggy' very quickly, which will give them weak stems unable to support the plants properly. When the temperature is above 10C during the day, it's ideal to put them outside in full sun, but keep them out of strong winds and heavy rain/hail showers until they're bigger, and don't forget to bring them in again at night! If two seeds have germinated in the same pot, wait until they grow their first true leaves then select the stronger one and pinch the weaker one off at soil level.

If you prefer, you can sow into smaller pots, cells, or a seed tray. When the plants are big enough to handle, though, they should be carefully transplanted to larger individual pots.

Ready to plant out...


Planting Out

Tomatoes don't like cold temperatures and frost will kill them, so keep them protected from cold but in plenty of sun until the risk of frost has passed. If you will be growing them outdoors, check the last-frost date in your area and wait until then before planting out. In my area, it's early- to mid-May. But if you plant them outside and then a late frost is forecast, don't panic - covering your plants gently with newspaper, a sheet or a towel (don't squash them!) is often enough to protect them. If you're going to be growing them in a heated greenhouse or conservatory, you will be able to plant them out much earlier - as soon as night temperatures in it are reliably around 10C. Plants should be at least 6"/15cm tall before planting out, and you should 'harden them off' for 7-10 days by putting them outside during the day, to gradually get them used to outdoor temperatures and winds.

Like virtually all fruiting crops, tomatoes need lots of sun, so pick a spot for them that gets at least six to eight hours of direct sun a day - the more the better.

I think the easiest way to grow tomatoes is in a growbag, and you can now get growbags specially formulated for growing veg in, which I highly recommend. Roll the growbag on its side to break up the compacted soil, put it in position, then cut holes for your plants and scoop the soil aside to make holes big enough for the tomato plants. Water your tomatoes before planting out to reduce stress, and try not to expose the roots to direct sunlight or leave them sitting around out of a pot for any longer than necessary. Pop them in the holes in the growbag, level and firm the soil around them, and water the growbag well.

See all the little hairs around the bottom of the tomato plant stem? If you plant it deeper than it was before, those hairs will grow into extra roots and give you an even stronger plant!

Tomatoes can also, of course, be grown in pots or in the soil in your garden - just make sure you use good compost to provide nutrients and retain moisture. Plant them around 12"/30cm apart.

Stick a cane in the ground as close as you can to each stem without damaging the roots. This is tricky in growbags as they are not very deep - try sticking the cane right through the bag into the ground, or check out the various types of cane support you can buy or make. As the plant grows taller, tie it loosely to the cane every 9-12" to support the weight of all that lovely fruit you're going to get! Another way to do it is to fix a stake or post every two or three plants, and tie strings between them that pass both sides of the stems. Look up 'Florida weave' for examples of this.


Caring For Your Plants

Uneven watering can cause fruit to split, so try to water regularly. Even in heavy rain, growbags and pots don't tend to catch that much water, so while your plants are fruiting, water them the same amount every day or two, whatever the weather. Growbags can be tricky to water - it sometimes just runs off. I remedy this by cutting the bottoms off plastic bottles and burying them neck down in the soil next to the plants - watering into these takes water straight to the roots where it's most needed, and allows the water to soak in gradually rather than running away.

  Splitting caused by irregular watering.

Many gardeners apply a tomato feed every week or two starting from when the first flowers open - this will encourage maximum fruiting. Using growbags already formulated for tomato-growing, I find this unnecessary, but who knows, maybe I'm missing out on an even bigger crop! Seaweed extract treatments are also particularly good for tomatoes.

Most tomato plants need pruning to keep plants focussed on fruit-production. (If your tomatoes are 'determinate', bush or tumbling varieties, they do not need pruning, but the ones I have given my friends are 'indeterminate' which means the plants will just branch out more and more, endlessly, so pruning is important.) Don't panic - it's very easy! What you're aiming for is a straight upright stem with only leaves, flower trusses and fruit trusses growing from it, like this:


When you see an extra shoot, or 'sucker', forming at the base of a leaf, like this...


Just pinch it off, like this...


If you do this carefully and don't damage the hairs on the stem, you can plant these prunings in pots of compost and grow whole new plants! (They may look like they're dying to start with, but they'll bounce back with a little TLC.) If you don't remove these extra shoots, your plant will end up with lots of extra branches and lots of extra leaf growth, will become tangled and unmanageable and will make your plant more susceptible to fungal infection...

Tomatoes are prone to a fungal disease called tomato blight, especially when grown outdoors, which starts as spots on the leaves, spreads to the stems and will eventually turn the fruit black. Rain carries airborne blight spores down to the leaves and soil, and the infection sets in during hot, humid spells. To decrease the chances of disease, try not to get the leaves wet when watering, and keep plants pruned so that they are well-ventilated and dry quickly after rain. If the lower leaves hang down to touch the soil, snip them off, and if any leaves turn yellow or develop brown or black patches, remove them too. Don't spread infection by touching infected parts and then touching non-infected parts, or by letting an infected plant touch others. If you think your plants may be infected, or during a period of more than 48 hours of hot, humid weather, spray your plants with a 1:1 milk and water solution, or 3 tbsps bicarbonate of soda and 1 tsp washing-up liquid to a gallon of water, to raise the alkalinity of the leaf surfaces and make it harder for fungi to take hold - or of course you could use a chemical fungicide. You can do this every week and after rain to prevent blight, or more often to slow its progess once infected. Spray in the evening or early morning, and always out of direct sunlight. Blightwatch.co.uk offers a free service to warn you when the weather conditions are just right for blight to hit your postcode so you can take precautions - give it a try!

 When black patches reach your plants' stems, you know it's blight.

If your indoor tomatoes are attacked by whitefly, grow basil around them - the flies hate it. Outdoor tomatoes don't tend to suffer much pest damage, but keep an eye out for slugs, snails, caterpillars and aphids just in case. Encouraging ladybirds in your garden is the most natural way to deal with aphids, but squishing them by hand is also very effective. Slugs, snails and caterpillars are best dealt with manually too - you'll need to go out after dark with a torch to catch slugs and snails - or you could use beer traps or organic slug pellets.

If you're growing tomatoes indoors, you will have to either open doors and windows wide during warm days to let pollinating insects in, or pollinate by hand. This is really easy - tomatoes are self pollinating, meaning they only need their own pollen to reach their own stigma, so it can be done simply by shaking flower trusses, flicking or blowing into the flowers, or by vibrating the flowers with the back of an electric toothbrush or an electric razor with the blade removed to mimic a buzzing bee! Do this every few days when flowers are opening. If you're growing outdoors, bees and other insects will do this for you. If you don't have many bees in your garden, you can attract them by growing more flowers! Here is a list of flowers which help to attract bees. Marigolds, poached-egg plant, poppies, borage, sunflowers and cornflowers are particularly good and easy to grow.


Harvesting

Harvest your tomatoes when they're fully red (if, that is, you're growing a red variety!), but try not to let any overripen on the plant, which may stall further fruiting. Keep your harvested tomatoes at room temperature - the fridge ruins their sweetness!

If you keep harvesting and pruning your plants, they'll keep producing right up until the first frosts around October or November. Enjoy them, and good luck!


And why not try saving your own seeds for more free tomato plants next year? Just click here and follow the instructions!

Tuesday, 20 March 2012

Pea Tip

Sowing peas is always a silly game here - the mice come and dig them up overnight and I have to resow. Sometimes it's a wonder I manage to grow any at all!

But this spring I remembered that mice are supposed to hate the smell of mint, and since I hadn't cut back the dead stems of last year's mint yet I did so, and scattered the cut-up stems and dried leaves over the soil after I'd sown my peas.

The peas are all up now, with not a single gap in the rows. Hurrah!


There's a tip I'll remember in future!

Thursday, 10 November 2011

Cutworms

I was dismayed last week, when I popped out to check on things in the garden, to find this:


The stem has been chewed through, right at the base, and just under the soil I found a little maggoty grub curled up where it had been. (Sorry, no photo; I was in too much of a hurry to squish the little bugger.)

This is the work of a cutworm - a brutally destructive pest I had not come up against until now. Cutworms are the larvae of several species of moth. They lay their eggs in the soil, and when the grub hatches it wraps itself around the first plant matter it comes across - usually a stem of a young plant - and tucks in. Seems a remarkably inefficient way to feed, killing off the whole plant in one bite, but these things are sent to try us... From the look of the grub I found, and the fact this is a brassica plant, I'm guessing the turnip moth is a pretty likely culprit - it's also one of the most prevalent types of cutworm.

Where cutworms are a problem, young plants can be protected with collars around their stems at soil level and sticking just below the soil. A few layers of newspaper can be used, or paper cups or toilet rolls, foil pie trays, 1" diameter plastic pipe, or short pieces of drinking straw, slit lengthways so that the stem can expand and the collar be removed later. (Once the stems are about the thickness of a pencil, cutworms are no longer a danger.) I've seen cornmeal around the base of the plant recommended too - apparently the larvae gladly eat it but cannot digest it, and die - and another method is to stick toothpicks or cocktail sticks in the soil round the plant, in the hope the grubs will wrap round those instead (though it seems to me you'd have to check them for grubs regularly, or they'll just move on to the next stem...) Winter soil cultivation can also help, by exposing overwintering larvae.

Saturday, 5 November 2011

Using Up Potatoes: Giant Rostis!

Every potato harvest inevitably comes with a few specimens damaged by sunlight, slugs, the fork that dug them up, or even by couchgrass roots, which burrowed a few holes through mine!


These should be separated from the undamaged potatoes and used first, as they're bound to go off sooner.

In an effort to use up our damaged spuds, of which we had really quite a few (and getting a little bored with mash) I thought I'd try to recreate a dish Eddie sampled in the fabulous veggie restaurant Terre a Terre recently:


(Disclaimer: My rosti may not be the same as/as good as Terre a Terre's, and certainly didn't look as good (theirs is pictured)... But it's still delish!) I altered it a bit to use up some watercress I had left over from something else, and it packs in even more flavour. Actually it's a really good dish to use up large amounts of spinach, watercress or any other similar leaf, as well as potatoes. You'll want at least 100g leaves per person and you could use much more if you wanted, so it's a good one for those bags/bunches of leaves the supermarkets and market stalls reduce at the end of the day too... It's a great, simple dish for one (though a bit of a juggling act if you're feeding a whole family) and a really tasty supper.

Giant Rostis with Watercress Sauce

  • Finely chop an onion and fry gently until really soft and golden, but not browned.
  • Grate around 200g potato per person, put it in a sieve or a clean tea towel and squeeze as much water out as you can.
  • Throw a couple of chopped garlic cloves in with the onion to soften.
  • Preheat your oven to 180C. 
  • Put the grated potato into a large bowl and season well. Add the chopped onion and garlic and gently combine (try not to break up or mash the potato too much!).
  • Divide the potato mixture into bowls - one per person. The shape of the bowls will shape the rostis.
  • Heat some oil in a non-stick frying pan, tip the first rosti in, and fry on a medium-high heat.
  • Once it is golden brown underneath, flip it over and do the other side. When that side is golden-brown too, put it on a large baking tray and do the next rosti...
  • When all your rostis are nicely browned, pop them in the oven to finish cooking in the middle while you make the sauce. (Maybe a more skilled or patient chef than I could cook them entirely in the frying pan, but because they're so big it seems to me they'd need this extra oven-time to cook right through.)
  • Meanwhile, wilt your leaves (100g-200g per person) down in a large saucepan with a knob of butter, salt and pepper, a splash of lemon juice and a little nutmeg. I used 2/3 watercress, 1/3 spinach, but you could use spinach only, or any combination really. I'm willing to bet chard, young kale, beetroot leaves, sorrel and any other similar leaf would work too (although sorrel really loses its colour when cooked so you might prefer to add it raw when pureeing).
  • When the leaves are cooked down, keep a couple of spoonsful aside for the garnish, and puree the rest (a wand-type blender is good for this). Add a spoonful or two of cream cheese (or a splash of cream and a little parmesan) and taste. Add more seasoning, cream/cheese or lemon juice if you so desire.
  • Poach (or soft-boil) your eggs.
  • When the rostis are done in the middle (ooh, about 15-25 minutes, depending how long you fried them for!), spread the sauce on each plate, top with a rosti, then a spoonful of wilted leaves, then a poached egg, and finally a generous handful of grated cheese!

To me this is great just as it is, but hardcore carnivores could be appeased with a sprinkling of crispy bacon bits or chopped ham. A nice piece of fish - especially smoked fish - would complement it very well too.
Related Posts Plugin for WordPress, Blogger...